Difference between revisions of "Easy Tagging for SharePoint online/Manual/Authorize at Azure AD"
From DIQA-Homepage
| (24 intermediate revisions by the same user not shown) | |||
| Line 1: | Line 1: | ||
| − | {{ | + | {{ManualPage |
| − | |Titel= | + | |Titel=User Manual: Authorize at Azure Active Directory |
| − | | | + | |RelatedProduct=Easy_Tagging_for_SharePoint_online |
| − | | | + | |Verlauf= |
| − | | | + | |Pfad=[[Main Page]] > Products > [[Easy_Tagging_for_SharePoint_online|Easy Tagging for SharePoint online]] > User Manual > [[Easy_Tagging_for_SharePoint_online/Manual/Authorize_at_Azure_AD|Authorize at Azure Active Directory]] |
| − | |Keywords= | + | |Keywords=SharePoint, o365, office 365, auto tagging |
| − | |SEO-Description= | + | |SEO-Description=The Easy Tagging App for SharePoint online greatly reduces the time to provide large numbers of documents with consistent tags. |
| − | |||
|en_link= | |en_link= | ||
| − | |||
}} | }} | ||
| + | |||
<div class="row"> | <div class="row"> | ||
<div class="col-xs-12 col-md-8 col-lg-9 col-xl-10"> | <div class="col-xs-12 col-md-8 col-lg-9 col-xl-10"> | ||
<p> | <p> | ||
| − | + | Before you are able to use the "MailDispatcher"-feature of the EasyTagging App, you have to authorize the EasyTagging App in your Azure Active Directory. | |
| + | </p> | ||
| + | <p> | ||
| + | Please follow this sequence of steps. If you require assistance then we are happy to help! | ||
</p> | </p> | ||
| − | |||
<div class="row funktionen-row"> | <div class="row funktionen-row"> | ||
<!-- --><div class="col-md-6 col-md-border funktionen" style="text-align: justify; "> | <!-- --><div class="col-md-6 col-md-border funktionen" style="text-align: justify; "> | ||
| − | === | + | === Open your Azure Active Directory === |
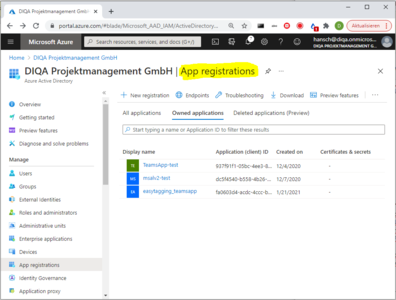
| − | + | Open your organisation's Azure Active Directory and select the "App registrations" action. | |
| − | |||
| − | |||
<!-- --></div> | <!-- --></div> | ||
| − | <!-- --><div class="col-md-6 col-md-border funktionen imageExpand" style="text-align: justify; >[[File: | + | <!-- --><div class="col-md-6 col-md-border funktionen imageExpand" style="text-align: justify; >[[File:App_registrations.PNG|x300px|center|middle]]</div> |
</div> | </div> | ||
| + | <div class="row funktionen-row"> | ||
| + | <!-- --><div class="col-md-6 col-md-border funktionen" style="text-align: justify; "> | ||
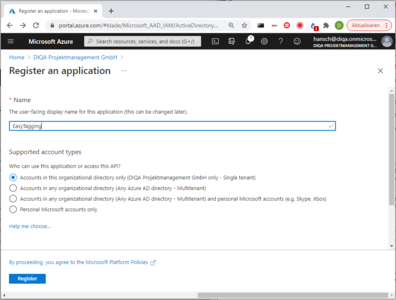
| + | === Register an application === | ||
| + | #Click on the "Register an application" link and enter this information: | ||
| + | :* Name: EasyTagging (or any other name of your choice) | ||
| + | :* Supported account types: option 1: "Accounts in this organizational directory only" | ||
| + | #Click on "Register" to submit the form. | ||
| + | # Copy the value of the Application client id into a text editor, you will need that information later | ||
| + | <!-- --></div> | ||
| + | <!-- --><div class="col-md-6 col-md-border funktionen imageExpand" style="text-align: justify; >[[File:App_registration_2.PNG|x300px|center|middle]]</div> | ||
</div> | </div> | ||
| + | <div class="row funktionen-row"> | ||
| + | <!-- --><div class="col-md-6 col-md-border funktionen" style="text-align: justify; "> | ||
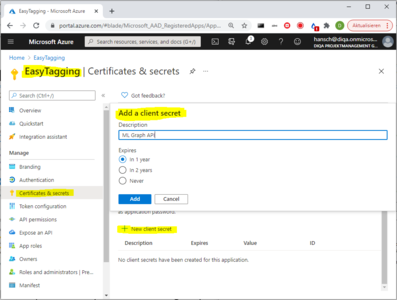
| + | === Create a client secret === | ||
| + | # Click on the newly created application | ||
| + | # Select "Certificates & secrets" | ||
| + | # Click on the "New client secret"-action and fill in this information: | ||
| + | :* short description | ||
| + | :* expiration | ||
| + | # Click on "Add" to submit the form | ||
| + | * Copy the value of the client secret into a text editor, you will need that information later | ||
| + | <!-- --></div> | ||
| + | <!-- --><div class="col-md-6 col-md-border funktionen imageExpand" style="text-align: justify; >[[File:Client_secret1.PNG|x300px|center|middle]]</div> | ||
| + | </div> | ||
| + | <div class="row funktionen-row"> | ||
| + | <!-- --><div class="col-md-6 col-md-border funktionen" style="text-align: justify; "> | ||
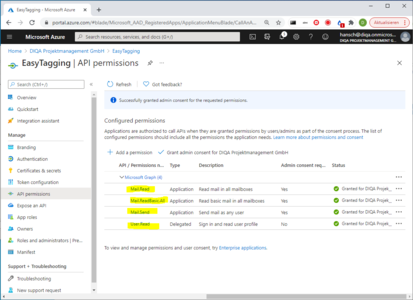
| + | === Grant permissions === | ||
| + | # Click on "API permissions" | ||
| + | # Click on "Add a permission" | ||
| + | # Select the "Microsoft Graph" API | ||
| + | # Select "Application permissions" as type of permission | ||
| + | # Tick the checkboxes for the "Mail.ReadBasic.All", "Mail.Read" and "Mail.Send" permissions | ||
| + | # Click on "Add permissions" to submit the form | ||
| + | <!-- --></div> | ||
| + | <!-- --><div class="col-md-6 col-md-border funktionen imageExpand" style="text-align: justify; >[[File:Permissions_new.PNG|x300px|center|middle]]</div> | ||
| + | </div> | ||
| + | <div class="row funktionen-row"> | ||
| + | <!-- --><div class="col-md-6 col-md-border funktionen" style="text-align: justify; "> | ||
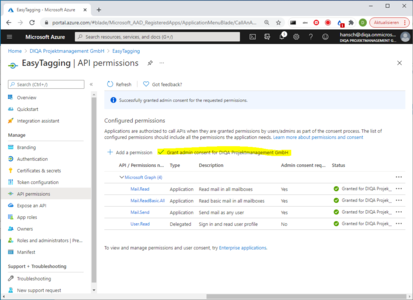
| + | === Grant admin consent === | ||
| + | # In the "Configured permissions" blade: click on "Grant admin consent" | ||
| + | <!-- --></div> | ||
| + | <!-- --><div class="col-md-6 col-md-border funktionen imageExpand" style="text-align: justify; >[[File:Adminconsent_new.PNG|x300px|center|middle]]</div> | ||
</div> | </div> | ||
| − | == | + | <div class="row funktionen-row"> |
| − | + | <!-- --><div class="col-md-6 col-md-border funktionen" style="text-align: justify; "> | |
| − | + | === Enter the Application ID and Secret into the Easy Tagging App === | |
| − | + | # Open the EasyTagging App from within your Sharepoint site | |
| − | ** | + | # Click on "create new mail dispatcher" which opens a dialog |
| + | # In the dialog click on "Click to enter authorization credentials" which opens another dialog | ||
| + | # In the dialog "Enter or edit authorization credentials" enter this information: | ||
| + | :* client application id from the steps above | ||
| + | :* client secret from the steps above | ||
| + | # click on "Store changes and close dialog" | ||
| + | # Enter the rest of the information to configure the mail dispatcher | ||
| + | # Test the mail dispatcher | ||
| + | If the mail dispatcher fails (you will see the error message in the dispatcher log) then you should review your application permissions. | ||
| + | Drop us an email if you have problems: info@diqa-pm.de | ||
| + | <!-- --></div> | ||
| + | <!-- --><div class="col-md-6 col-md-border funktionen imageExpand" style="text-align: justify; >[[File:Easytagging.PNG|x300px|center|middle]]</div> | ||
| + | </div> | ||
==Questions?== | ==Questions?== | ||
{{Emailformular | {{Emailformular | ||
| Line 38: | Line 90: | ||
|Placeholder= | |Placeholder= | ||
}} | }} | ||
| − | + | </div> | |
<div class="hideSM col-md-4 col-lg-3 col-xl-2"> | <div class="hideSM col-md-4 col-lg-3 col-xl-2"> | ||
| − | |||
| − | |||
| − | |||
| − | |||
| − | |||
| − | |||
| − | |||
| − | |||
{{Linkbox | {{Linkbox | ||
|color=#a0b844 | |color=#a0b844 | ||
| Line 54: | Line 98: | ||
* [[Easy_Tagging_for_SharePoint_online|Easy Tagging App]] | * [[Easy_Tagging_for_SharePoint_online|Easy Tagging App]] | ||
}} | }} | ||
| − | |||
| − | |||
| − | |||
| − | |||
| − | |||
| − | |||
| − | |||
</div> | </div> | ||
</div> | </div> | ||
Latest revision as of 10:04, 8 April 2021
Main Page > Products > Easy Tagging App for Sharepoint online > User Manual > Authorize at Azure Active Directory
Manual
User Manual: Authorize at Azure Active Directory
Before you are able to use the "MailDispatcher"-feature of the EasyTagging App, you have to authorize the EasyTagging App in your Azure Active Directory.
Please follow this sequence of steps. If you require assistance then we are happy to help!
Open your Azure Active Directory
Open your organisation's Azure Active Directory and select the "App registrations" action.
Register an application
- Click on the "Register an application" link and enter this information:
- Name: EasyTagging (or any other name of your choice)
- Supported account types: option 1: "Accounts in this organizational directory only"
- Click on "Register" to submit the form.
- Copy the value of the Application client id into a text editor, you will need that information later
Create a client secret
- Click on the newly created application
- Select "Certificates & secrets"
- Click on the "New client secret"-action and fill in this information:
- short description
- expiration
- Click on "Add" to submit the form
- Copy the value of the client secret into a text editor, you will need that information later
Grant permissions
- Click on "API permissions"
- Click on "Add a permission"
- Select the "Microsoft Graph" API
- Select "Application permissions" as type of permission
- Tick the checkboxes for the "Mail.ReadBasic.All", "Mail.Read" and "Mail.Send" permissions
- Click on "Add permissions" to submit the form
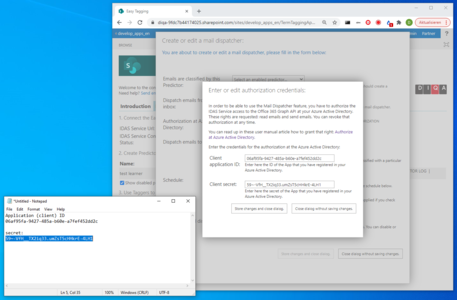
Enter the Application ID and Secret into the Easy Tagging App
- Open the EasyTagging App from within your Sharepoint site
- Click on "create new mail dispatcher" which opens a dialog
- In the dialog click on "Click to enter authorization credentials" which opens another dialog
- In the dialog "Enter or edit authorization credentials" enter this information:
- client application id from the steps above
- client secret from the steps above
- click on "Store changes and close dialog"
- Enter the rest of the information to configure the mail dispatcher
- Test the mail dispatcher
If the mail dispatcher fails (you will see the error message in the dispatcher log) then you should review your application permissions. Drop us an email if you have problems: [email protected]
Questions?
related products
