Difference between revisions of "Blog/Boost document findability with tags in O365"
| Line 179: | Line 179: | ||
<div class="row funktionen-row"> | <div class="row funktionen-row"> | ||
<!-- --><div class="col-md-6 col-md-border funktionen" style="text-align: justify; "> | <!-- --><div class="col-md-6 col-md-border funktionen" style="text-align: justify; "> | ||
| − | === Create an Enterprise Search Center === | + | === 1. Create an Enterprise Search Center === |
# Open the contents of your Sharepoint site and click on "subsites". | # Open the contents of your Sharepoint site and click on "subsites". | ||
# Create a new sub site by clicking on the "New" action link. | # Create a new sub site by clicking on the "New" action link. | ||
| Line 190: | Line 190: | ||
<div class="row funktionen-row"> | <div class="row funktionen-row"> | ||
<!-- --><div class="col-md-6 col-md-border funktionen" style="text-align: justify; "> | <!-- --><div class="col-md-6 col-md-border funktionen" style="text-align: justify; "> | ||
| − | === Adjust the search schema: map the crawled property to a refinable managed property === | + | === 2. Adjust the search schema: map the crawled property to a refinable managed property === |
# Open the Sharepoint admin center for your tenant. | # Open the Sharepoint admin center for your tenant. | ||
# Click on the "Search" section | # Click on the "Search" section | ||
| Line 204: | Line 204: | ||
<div class="row funktionen-row"> | <div class="row funktionen-row"> | ||
<!-- --><div class="col-md-6 col-md-border funktionen" style="text-align: justify; "> | <!-- --><div class="col-md-6 col-md-border funktionen" style="text-align: justify; "> | ||
| − | === Add the new refiner to the search page === | + | === 3. Add the new refiner to the search page === |
| − | + | # Open the search center | |
| + | # Open the search results page (named "results.aspx") | ||
| + | # Click on "Edit page" | ||
| + | # In the page edit view: open the property settings of the Refinement webpart | ||
| + | # Click on the button "Choose refiners" | ||
| + | # In the "refinement configuration" dialog: add the refinable managed propery | ||
| + | (from the search schema step), like: RefinableString00 (or 01 etc). | ||
| + | # You should see sample values that contain you document types. | ||
| + | # Click on "Ok" to add RefinableString00 to the refiner | ||
| + | # Save the modified properties of the webpart by clicking on "OK" | ||
| + | # Store the modified page. | ||
<!-- --></div> | <!-- --></div> | ||
| − | <!-- --><div class="col-md-6 col-md-border funktionen imageExpand" style="text-align: justify; >[[File: | + | <!-- --><div class="col-md-6 col-md-border funktionen imageExpand" style="text-align: justify; >[[File:Search_refiner.JPG|x300px|center|middle]]</div> |
</div> | </div> | ||
<div class="row funktionen-row"> | <div class="row funktionen-row"> | ||
<!-- --><div class="col-md-6 col-md-border funktionen" style="text-align: justify; "> | <!-- --><div class="col-md-6 col-md-border funktionen" style="text-align: justify; "> | ||
| − | === | + | === 4. verify the search results === |
| − | + | # Open the search center | |
| + | # Enter "*" as search string and submit the query | ||
| + | # Inspect the refiner values: they should include your document types | ||
| + | # Click on a refiner value, like "invoice", in order to restrict your search results to contain only invoices and bills. | ||
| + | |||
| + | <big>If the new refiner does not contain values then you have to wait until the Sharepoint online search engine has completed re-indexing your library. If still no values show up then you have to go back to your library settings and click on "re-index library".</big> | ||
<!-- --></div> | <!-- --></div> | ||
| − | <!-- --><div class="col-md-6 col-md-border funktionen imageExpand" style="text-align: justify; >[[File: | + | <!-- --><div class="col-md-6 col-md-border funktionen imageExpand" style="text-align: justify; >[[File:Searchresults.JPG|x300px|center|middle]]</div> |
</div> | </div> | ||
Revision as of 19:33, 29 September 2020
O365: Boost document findability with tags (September 1, 2020)
Finding documents in Sharepoint online/Office 365 can be tedious. If you want to restrict your search to certain document types (like: reports, inquiries, CVs, sales orders, invoices) you either end up with too many irrelevant search hits or relevant documents don't show up because they don't include the search term. If you rely on Sharepoint's fulltext search capabilities only, then your users will be frustrated and spend too much time to find the right documents.
You can provide your users with a better search experience if you use search refiners. Users can further refine their search result by clicking on the refiner values, e.g. to retrieve "sales orders" or "invoices", only. Before you are able to create meaningful search refiners, you have to arrange for a couple of pre-requisites which include tagging documents with tags. This guide shows you how to automatically tag documents with their type (e.g. invoice, sales order, cv, inquiry) and how to provide search refiners that contain these document types.
Frustrating search experience without meaningful refiners:
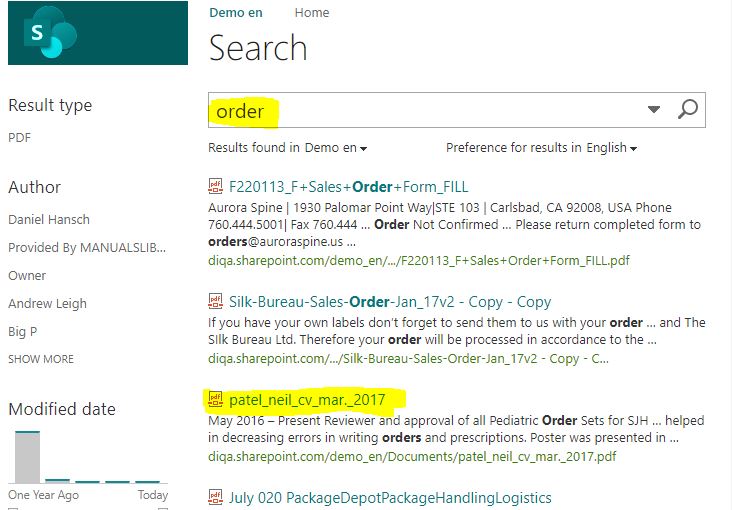
Entering the search term "order" returns a lot of irrelevant documents (e.g. a CV) and even misses some sales order documents.
Better: filter documents by type, language, etc:
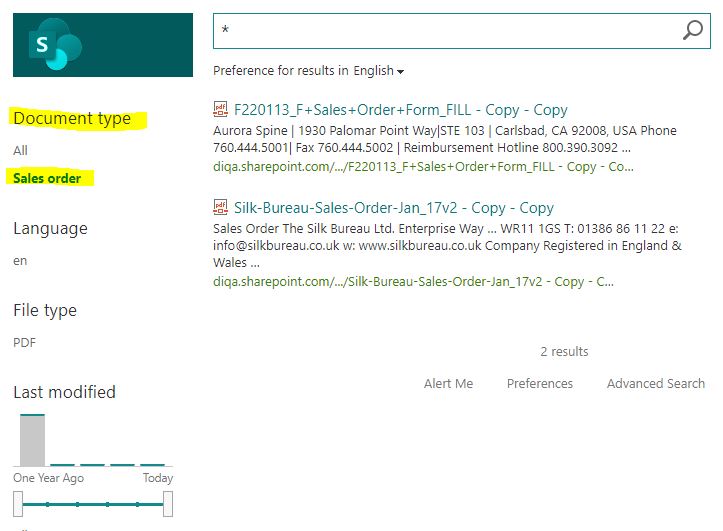
If you provide search refiners, then the users will be able to precicely filter for all "sales order" documents, for instance.


