Finding documents in Sharepoint online/Office 365 can be tedious. If you want to restrict your search to certain document types (like: reports, inquiries, CVs, sales orders, invoices) you either end up with too many irrelevant search hits or relevant documents don't show up because they don't include the search term. If you rely on Sharepoint's fulltext search capabilities only, then your users will be frustrated and spend too much time to find the right documents.
You can provide your users with a better search experience if you use search refiners. Users can further refine their search result by clicking on the refiner values, e.g. to retrieve "sales orders" or "invoices", only. Before you are able to create meaningful search refiners, you have to arrange for a couple of pre-requisites which include tagging documents with tags. This guide shows you how to automatically tag documents with their type (e.g. invoice, sales order, cv, inquiry) and how to provide search refiners that contain these document types.
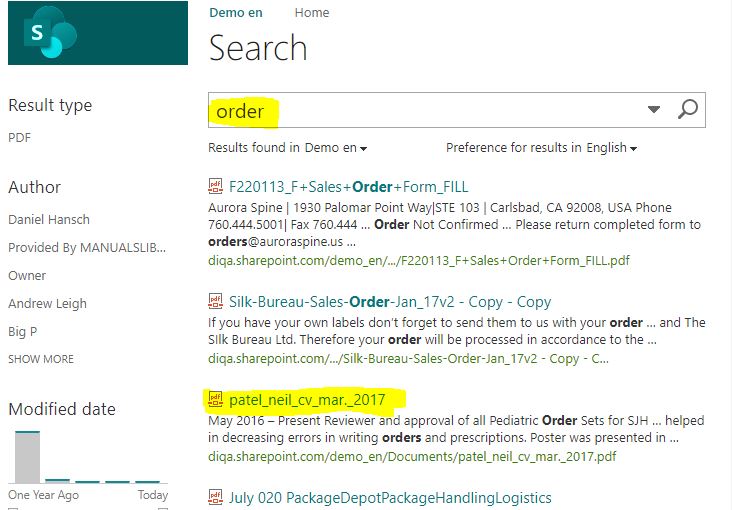
Frustrating search experience without meaningful refiners:
Entering the search term "order" returns a lot of irrelevant documents (e.g. a CV) and even misses some sales order documents.
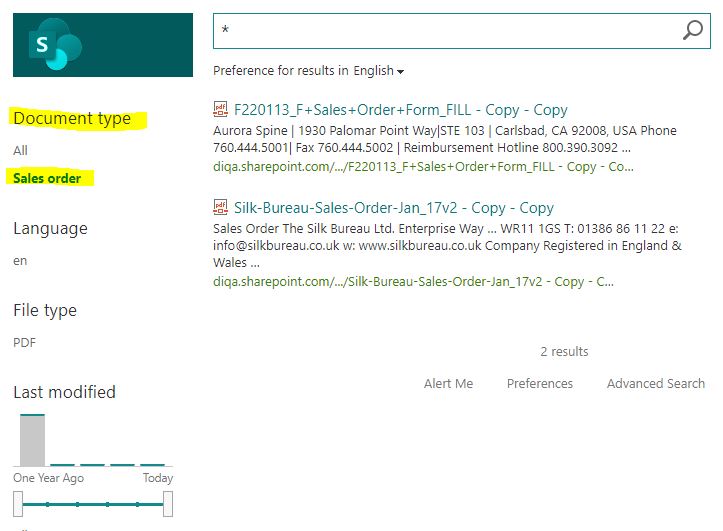
Better: filter documents by type, language, etc:
If you provide search refiners, then the users will be able to precicely filter for all "sales order" documents, for instance.
Step 1: Prepare your library
1. Create a termset with your document types
- Open the termstore manager (from the site settings)
- Create a new termset, named "document types"
- Create a term for each document type that you keep in your document library, e.g. inquiry, invoice, sales order, resume
2. Create a column for your document library that contins the document types
- Open the document library
- Open the library advanced settings
- Click on "create column"
- Enter the name of the new library column, e.g. "document type"
- Select "managed metadata" as type
- In the term set settings: select the termset "document type" (from the step above)
- Click on "Save" to close the form
3. Manually tag a couple of documents as examples (not all!)
- Open the library settings and add the new column "Document types" to the default view of the library
- Open the "Quick Edit" view of the library.
- Populate the field "Document types" with meaningful values for a couple of documents per document type. It is not necessary to provide each document with a tag, but the more examples you provide, the better the results will be. You should achieve a coverage of 20% of all documents per document type (and at least 10 examples per document type).
You have now prepared everything required to teach the "Easy Tagging App" about your way to tag. You can now carry on and install the Easy Tagging App and train the "Learn Tags"-predictor.
Step 2: Automatically tag all your documents
1. Install the Easy Tagging App from the App Source (free evaluation!)
- Open the site settings and click on "Add an App"
- Click on "Sharepoint Store"
- In the Sharepoint Store: enter "diqa" as search term
- Click on the "Easy Tagging" card to initiate the installation.
2. Launch the app and grant it the requested permissions
- Open the site contents again where you should find the newly installed Easy Tagging App
- Click on the App and grant it the requested permissions.
- The configuration page of the app opens in a new tab.
3. Connect the Easy Tagging App with the IDAS service (1/2)
- In the configuration page of the Easy Tagging App: click on the "Predictors & Taggers" tab
- Click on the link "Click here to connect to IDAS"
4. Connect the Easy Tagging App with the IDAS service (2/2)
- In the connection dialog: select the "IDAS Evaluation Service" tab
- Click on "I accept the terms of use" tick box
- If the service status says "IDAS evaluation service is available", then click on the "connect" button. If the status says something different: click on "refresh status".
- The dialog closes and you can setup a predictor.
5. Create a "Learn Tags" perdictor and let it learn from your examples
- After you have created a connection to the IDAS Evaluation service you can setup a predictor which learns to tag documents from your examples.
- In the (now empty) list of predictors click on the link: "Click to create new item".
- In the selection dialog, select the "Learn Tags" predictor.
- The configuration form for the new "Learn Tags" predictor opens.
- Enter the name of the predictor, e.g. "Document types"
- In the field "Learn from documents in this library": select the library that contains your documents.
- In the field "Encode with": select the entry "Glove English subset 100k words".
- In the field "Learn to predict tags from this managed metadata column": select the "document types" column that you created in the earlier steps
- In the field "model": select "Simple CNN model"
- Keep the default values of the subsequent fields.
- Click on "Start training" to initiate the training process.
- You can inspect the progress of the training process in the status bar of the predictor.
6. Create a tagger that automatically creates tags for all documents (and future documents)
- As soon as the training of the predictor has completed, you can enable the predictor by clicking on the "enable" action link
- Click on "OK" in the prompt that asks you if you want to create a tagger.
- The "Create a tagger" form opens.
- You can keep all default settings in the form.
- Tick off the "Tagging Schedule" box if you don't want to have this tagger to automatically process new documents per a schedule.
- Click on "Store changes" to create the new tagger.
7. Automatically tag all documents that have no tag yet
- In the list of taggers: click on the "START" action link to initiate the tagging process of all documents.
- Before the tagger is launched, a dialog opens: select the option "include documents that have not been modified or created since the last tagger run". This will make sure that your existing documents that have no tags yet, will be tagged now.
- Click on "Start tagging now"
- After the tagging has completed you can inspect the tagging log of the tagger (action link "open the tagging log")
8. Important: re-index your document library
- Opent the settings of your library
- Click on "re-index document library"
- Click on "Ok" to close the form
Now all your documents in the library have been provided with tags, and the search index is being updated in the background. You can now carry on and setup the search page that uses these tags.
Step 3: Create a search center that includes the search refiners
1. Create an Enterprise Search Center
- Open the contents of your Sharepoint site and click on "subsites".
- Create a new sub site by clicking on the "New" action link.
- A form opens where you specify the new sub site.
- In the template field: select "Enterprise/Basic Search Center".
- Click on "Create" to create the new seach center.
2. Adjust the search schema: map the crawled property to a refinable managed property
- Open the Sharepoint admin center for your tenant.
- Click on the "Search" section
- In the Search section: click on "Search schema"
- In the "Search schema" settings: activate the tab "Crawled properties"
- Search for all crawled properties that start with the string "ows_"
- Select the crawled property that relates to your "document type"-managed property, e.g. "ows_Document_x0020_type"
- Create a mapping to the managed property "RefinableString01" (or 00, or any other number).
- Save the settings.
3. Add the new refiner to the search page
- Open the search center
- Open the search results page (named "results.aspx")
- Click on "Edit page"
- In the page edit view: open the property settings of the Refinement webpart
- Click on the button "Choose refiners"
- In the "refinement configuration" dialog: add the refinable managed propery
(from the search schema step), like: RefinableString00 (or 01 etc).
- You should see sample values that contain you document types.
- Click on "Ok" to add RefinableString00 to the refiner
- Save the modified properties of the webpart by clicking on "OK"
- Store the modified page.
4. verify the search results
- Open the search center
- Enter "*" as search string and submit the query
- Inspect the refiner values: they should include your document types
- Click on a refiner value, like "invoice", in order to restrict your search results to contain only invoices and bills.
If the new refiner does not contain values then you have to wait until the Sharepoint online search engine has completed re-indexing your library. If still no values show up then you have to go back to your library settings and click on "re-index library".