File list
From DIQA-Homepage
This special page shows all uploaded files.
First page |
Previous page |
Next page |
Last page |
| Date | Name | Thumbnail | Size | Description | Versions |
|---|---|---|---|---|---|
| 11:32, 14 April 2021 | Finden statt suchen menu.jpg (file) |  |
7 KB | 1 | |
| 11:54, 14 April 2021 | EasyTaggingText.gif (file) |  |
10 KB | 1 | |
| 11:50, 14 April 2021 | EasyTaggingText.jpg (file) |  |
11 KB | 2 | |
| 10:04, 5 August 2020 | TermExtractor menue.png (file) |  |
12 KB | 4 | |
| 10:04, 5 August 2020 | EasyTaggingText.png (file) |  |
12 KB | 2 | |
| 12:05, 14 April 2021 | Treerefiner frontpage.jpg (file) |  |
13 KB | 1 | |
| 11:28, 14 April 2021 | Finden statt suchen frontpage.jpg (file) |  |
13 KB | 1 | |
| 11:13, 14 April 2021 | Finden statt suchen menu.png (file) |  |
19 KB | 3 | |
| 12:21, 14 April 2021 | PowerSearchMenue.png (file) |  |
21 KB | 2 | |
| 12:17, 14 April 2021 | Automatic Tagging with Easy Tagging App-frontpage.jpg (file) |  |
22 KB | 1 | |
| 10:04, 5 August 2020 | EasyTaggingMainPage.png (file) |  |
41 KB | 2 | |
| 10:24, 5 August 2020 | QueryFacets.png (file) |  |
42 KB | 1 | |
| 10:15, 29 September 2020 | Launch the app modern.png (file) |  |
43 KB | 1. Open the site contents again where you should find the newly installed Easy Tagging App 2. Click on the App and grant it the requested permissions. 3. The configuration page of the app opens in a new tab. | 1 |
| 14:15, 1 October 2020 | Diqa search install ps.png (file) |  |
43 KB | 1 | |
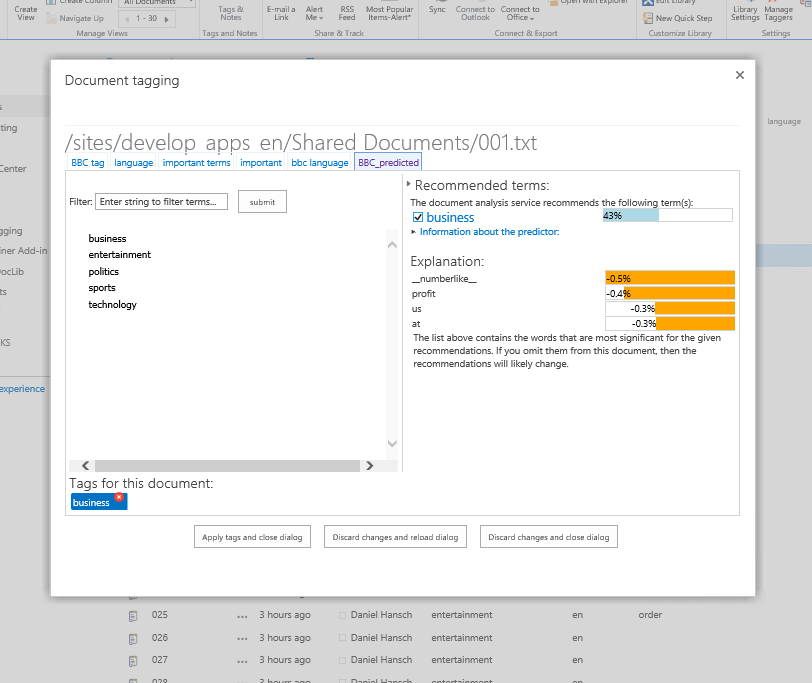
| 10:08, 5 August 2020 | Tagdocument expl.png (file) |  |
46 KB | 2 | |
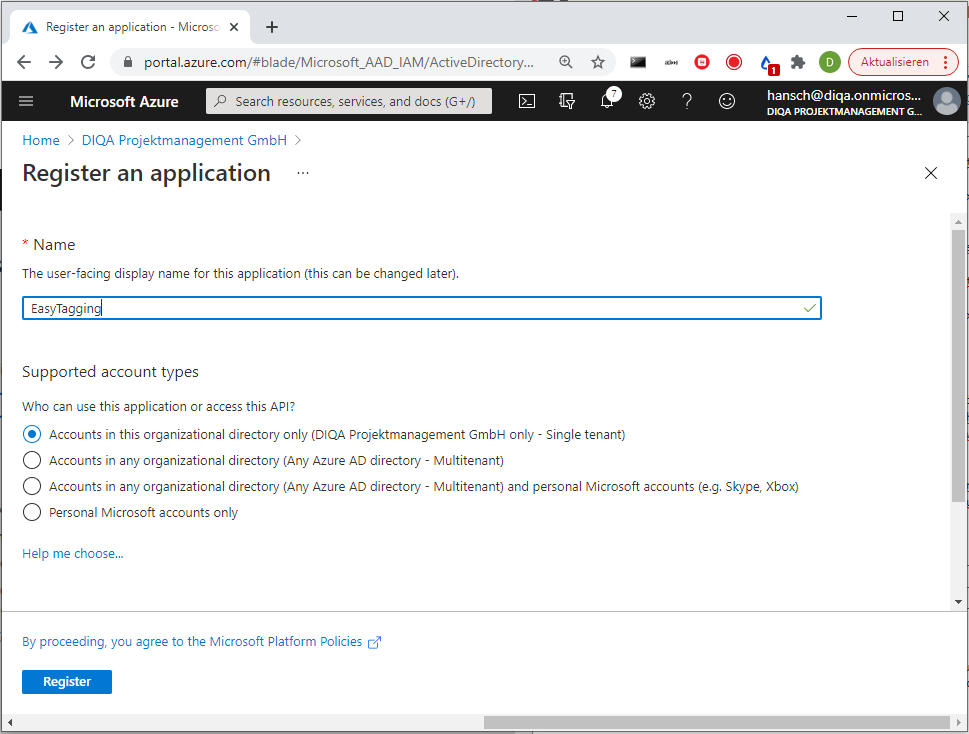
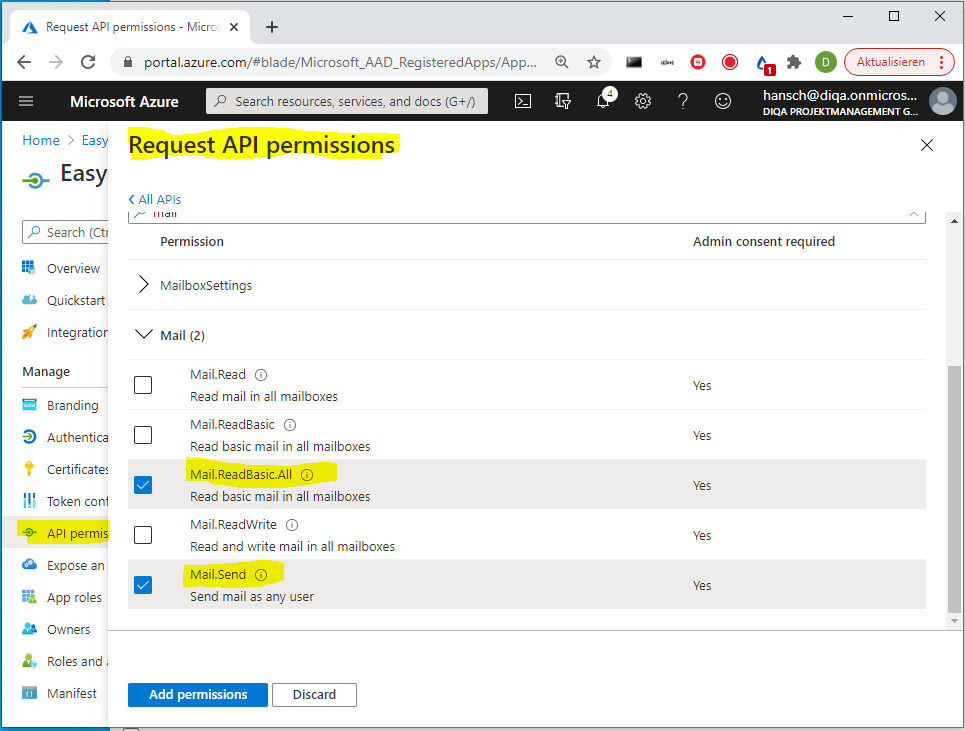
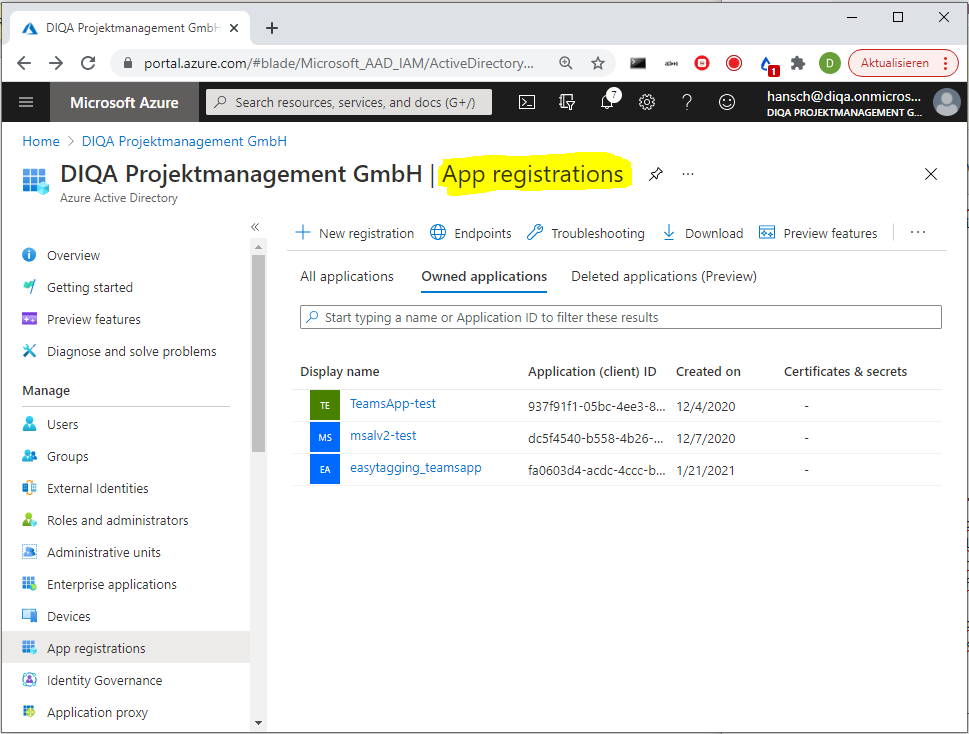
| 16:50, 1 April 2021 | App registration 2.PNG (file) |  |
51 KB | 1 | |
| 15:04, 5 May 2021 | Treerefiner standardrefiner.PNG (file) |  |
53 KB | 1 | |
| 14:49, 28 September 2020 | Capture-refinement3.JPG (file) |  |
56 KB | 1 | |
| 10:34, 29 September 2020 | Apptab.png (file) |  |
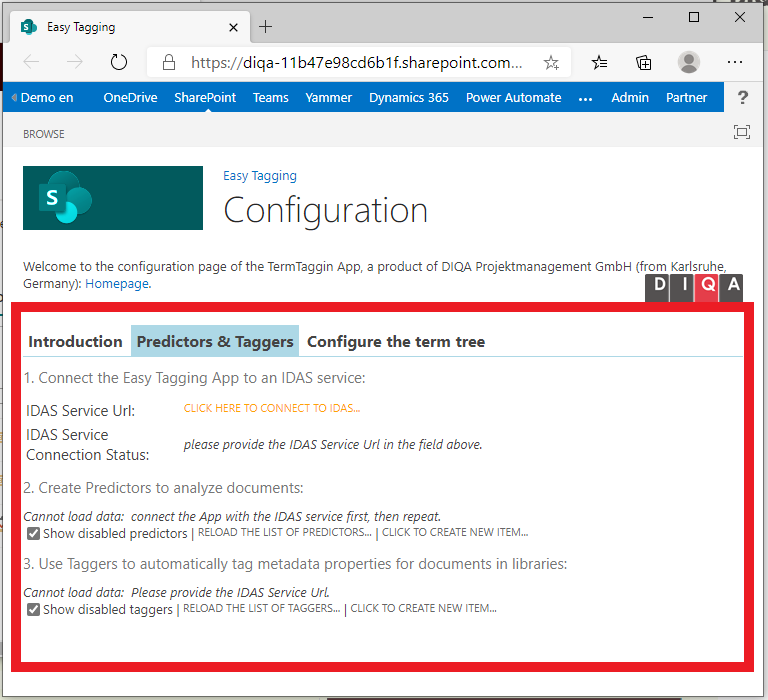
57 KB | 1. In the configuration page of the Easy Tagging App: click on the "Predictors & Taggers" tab 2. Click on the link "Click here to connect to IDAS" | 1 |
| 11:34, 18 June 2020 | Automatic Tagging with Easy Tagging App.PNG (file) | Error creating thumbnail: File missing |
59 KB | 1 | |
| 09:38, 5 August 2020 | Automatic Tagging with Easy Tagging App.png (file) |  |
59 KB | 1 | |
| 09:52, 6 April 2021 | Client secret1.PNG (file) |  |
61 KB | 1 | |
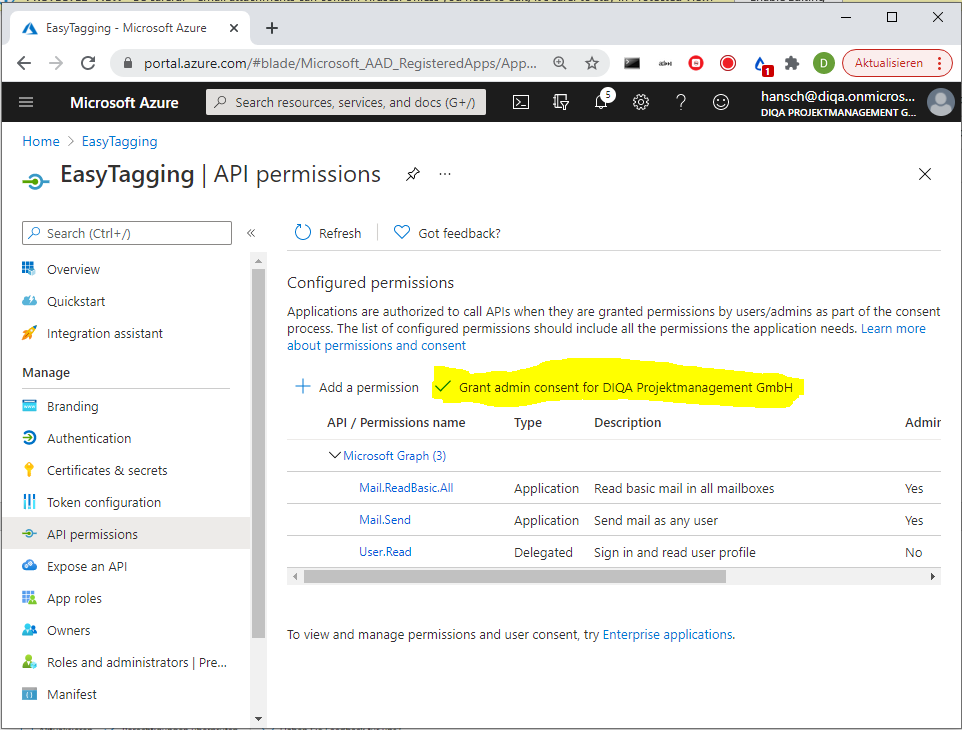
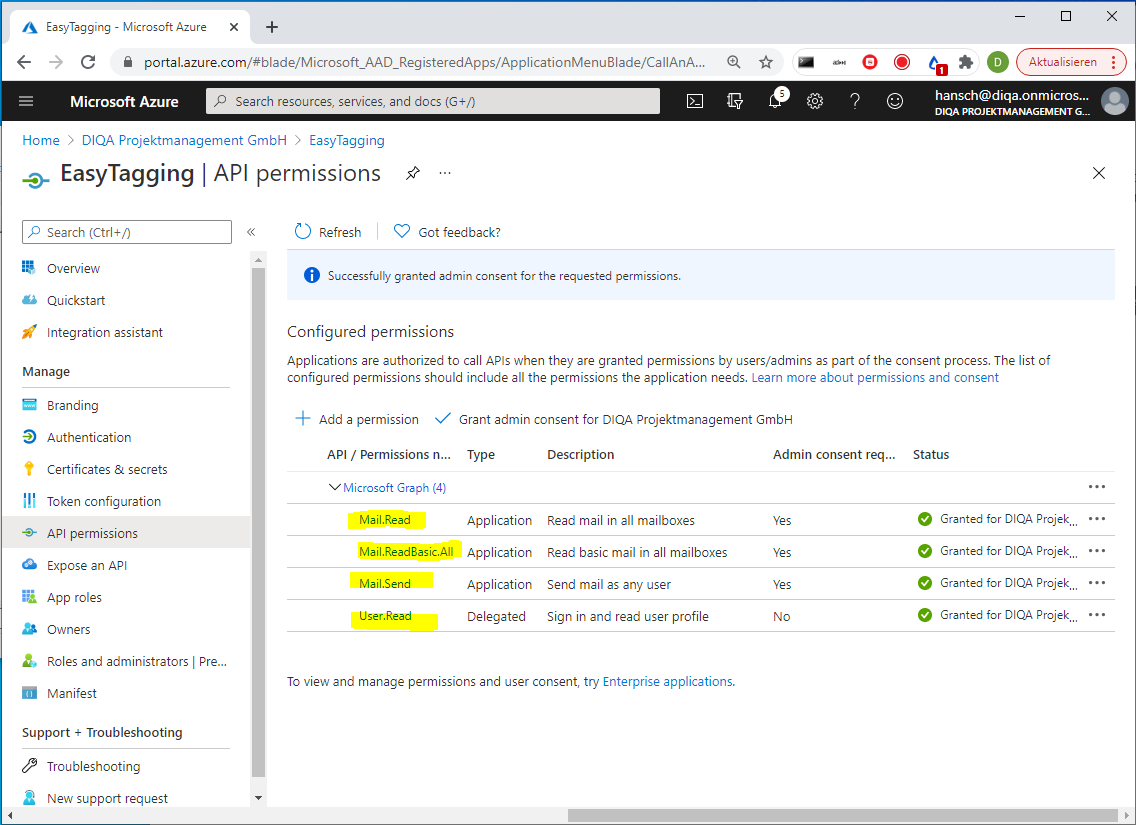
| 10:15, 6 April 2021 | Permissions.PNG (file) |  |
61 KB | 1 | |
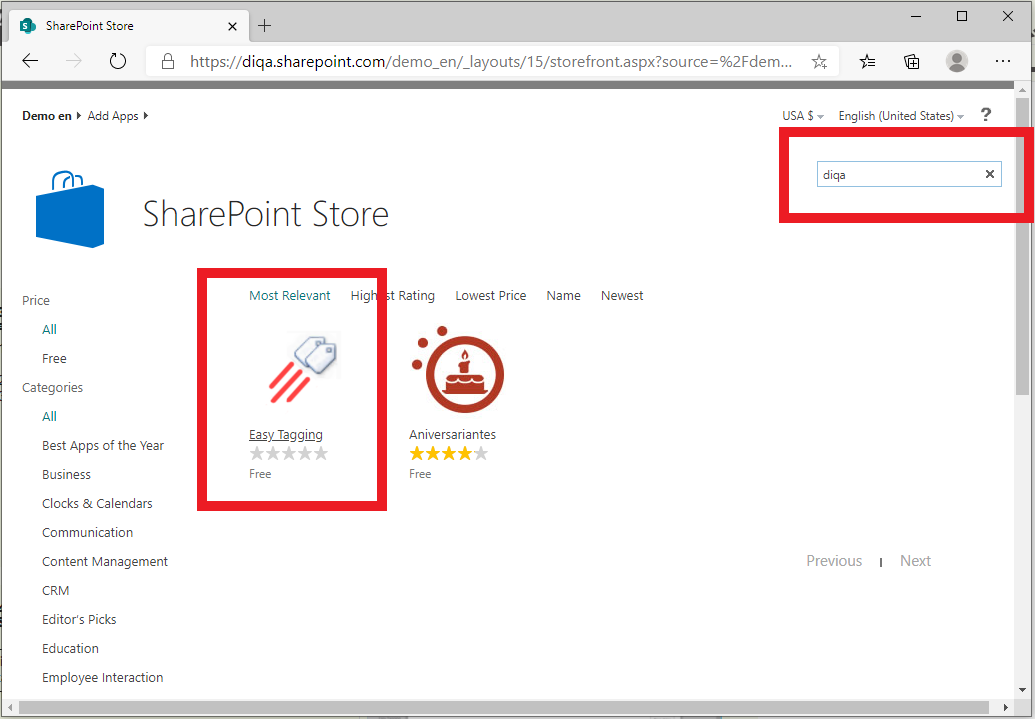
| 09:47, 29 September 2020 | Appstore.png (file) |  |
61 KB | 1. Open the site settings and click on "Add an App" 2. Click on "Sharepoint Store" 3. In the Sharepoint Store: enter "diqa" as search term 4. Click on the "Easy Tagging" card to initiate the installation. | 1 |
| 16:46, 1 April 2021 | App registrations.PNG (file) |  |
68 KB | 1 | |
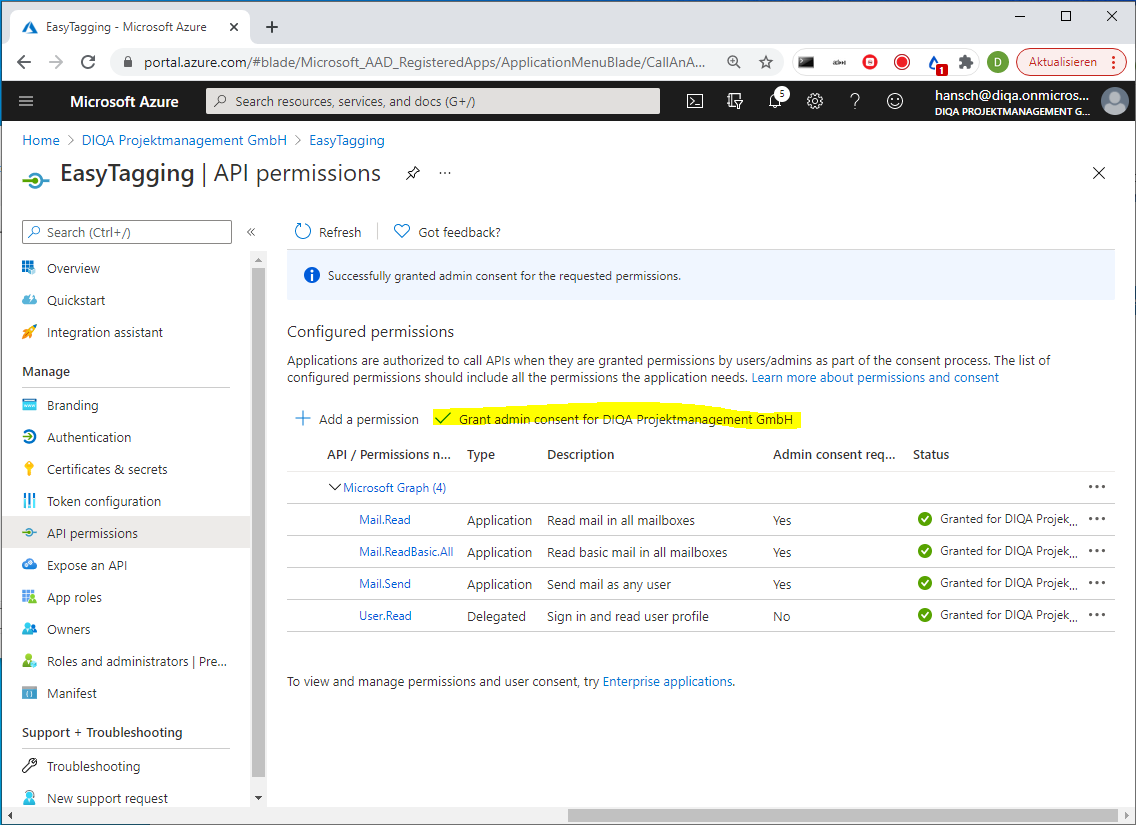
| 10:51, 6 April 2021 | Adminconsent.PNG (file) |  |
69 KB | 1 | |
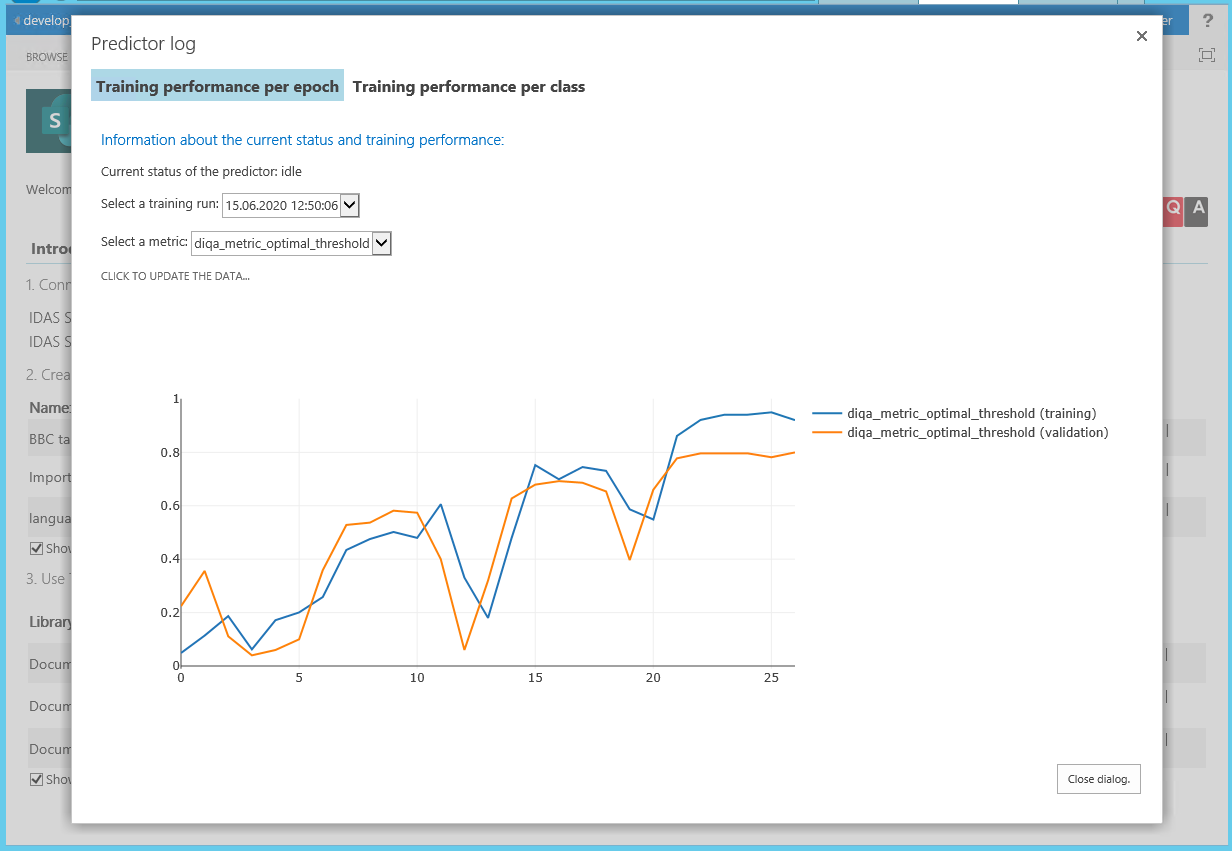
| 10:06, 5 August 2020 | Performance.png (file) |  |
69 KB | 2 | |
| 10:06, 5 August 2020 | Eval.png (file) |  |
71 KB | 2 | |
| 14:55, 28 September 2020 | Fulltextsearch3.JPG (file) |  |
72 KB | 1 | |
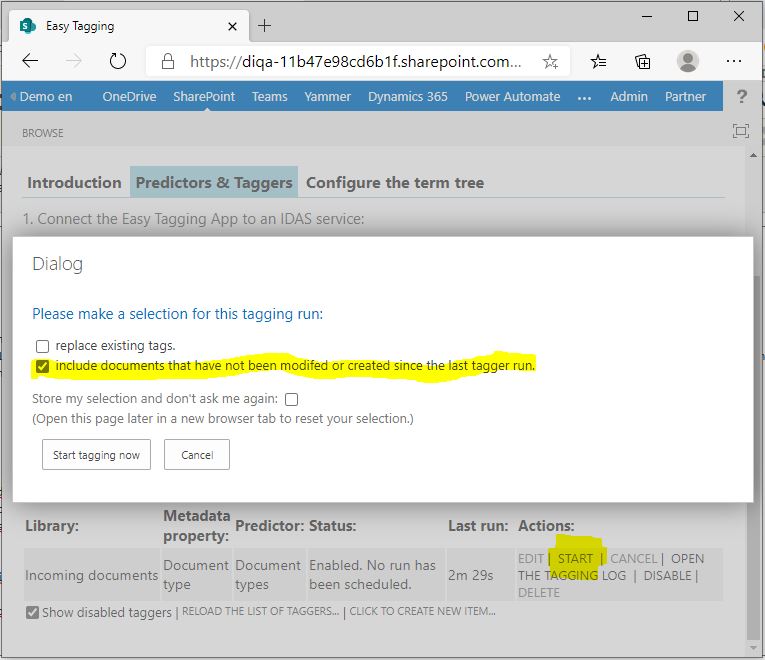
| 17:16, 29 September 2020 | Start tagging 2.JPG (file) |  |
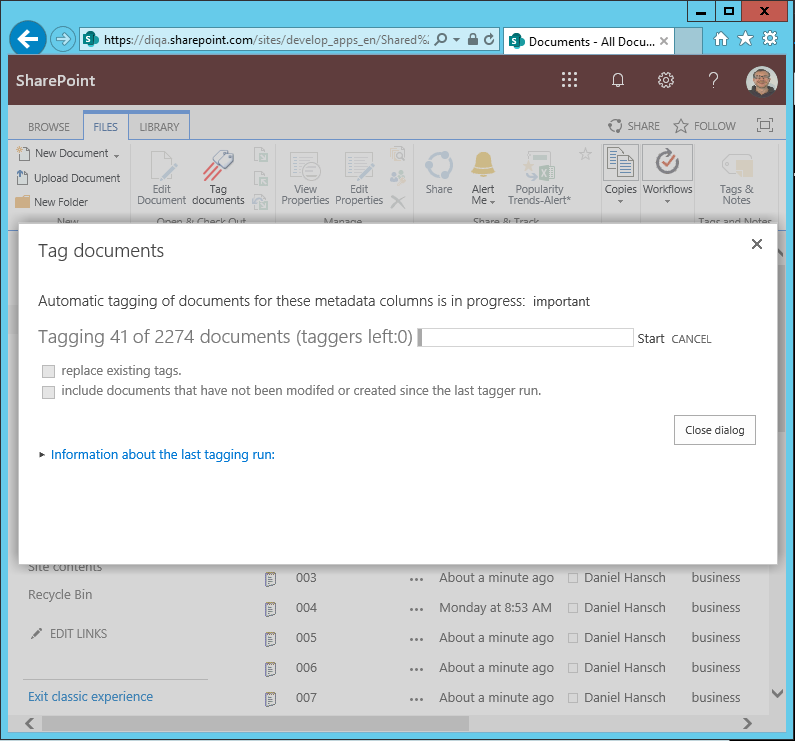
72 KB | 1. In the list of taggers: click on the "START" action link to initiate the tagging process of all documents. 2. Before the tagger is launched, a dialog opens: select the option "include documents that have not been modified or created since the last t... | 1 |
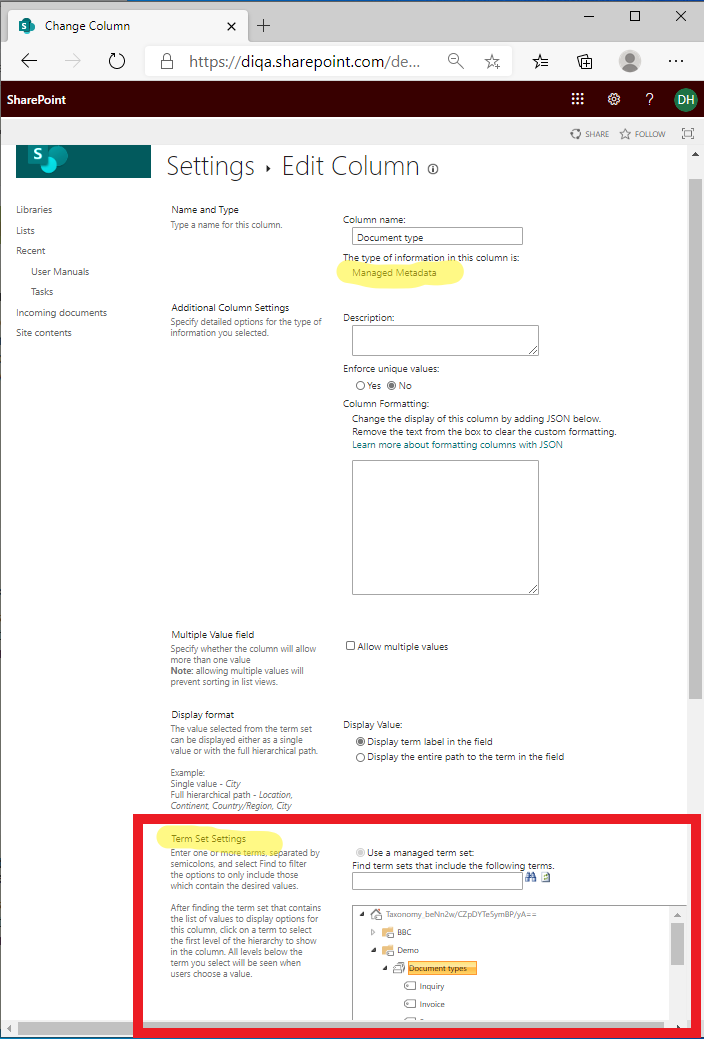
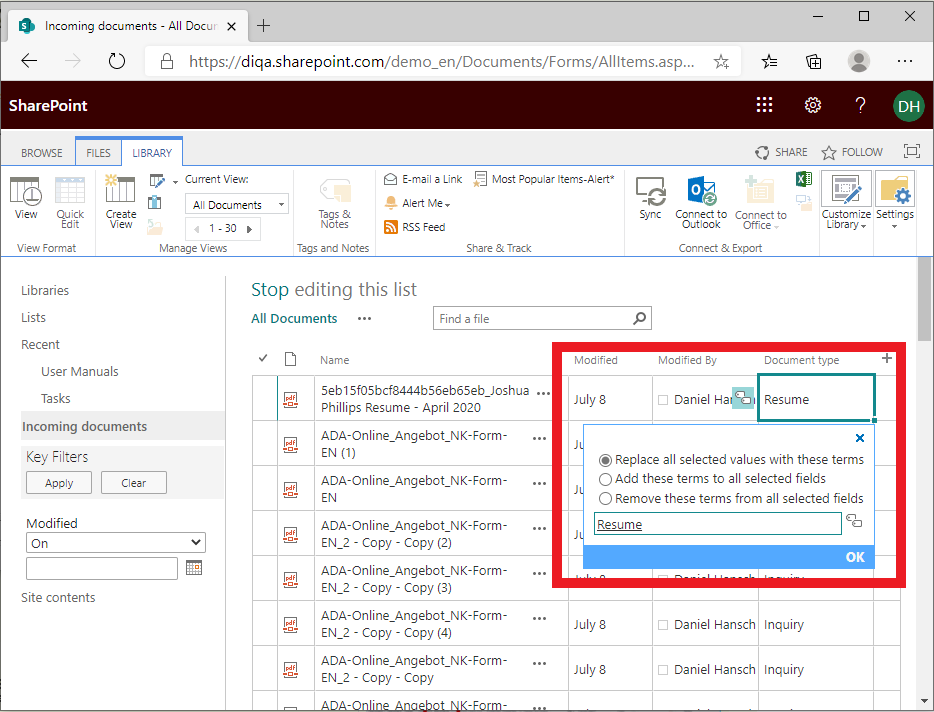
| 17:57, 28 September 2020 | Create column.png (file) |  |
74 KB | - Open the document library - Open the library advanced settings - Click on "create column" - Enter the name of the new library column, e.g. "document type" - Select "managed metadata" as type - In the term set settings: select the termset "document ty... | 1 |
| 14:42, 28 September 2020 | Capture-refinement2.JPG (file) |  |
74 KB | 1 | |
| 14:43, 28 September 2020 | Fulltextsearch2.JPG (file) |  |
76 KB | 1 | |
| 09:08, 29 September 2020 | Tagexample.png (file) |  |
77 KB | 1. Open the library settings and add the new column "Document types" to the default view of the library 2. Open the "Quick Edit" view of the library. 3. Populate the field "Document types" with meaningful values for a couple of documents per document t... | 1 |
| 16:45, 1 October 2020 | Diqa search install er.png (file) |  |
77 KB | 2 | |
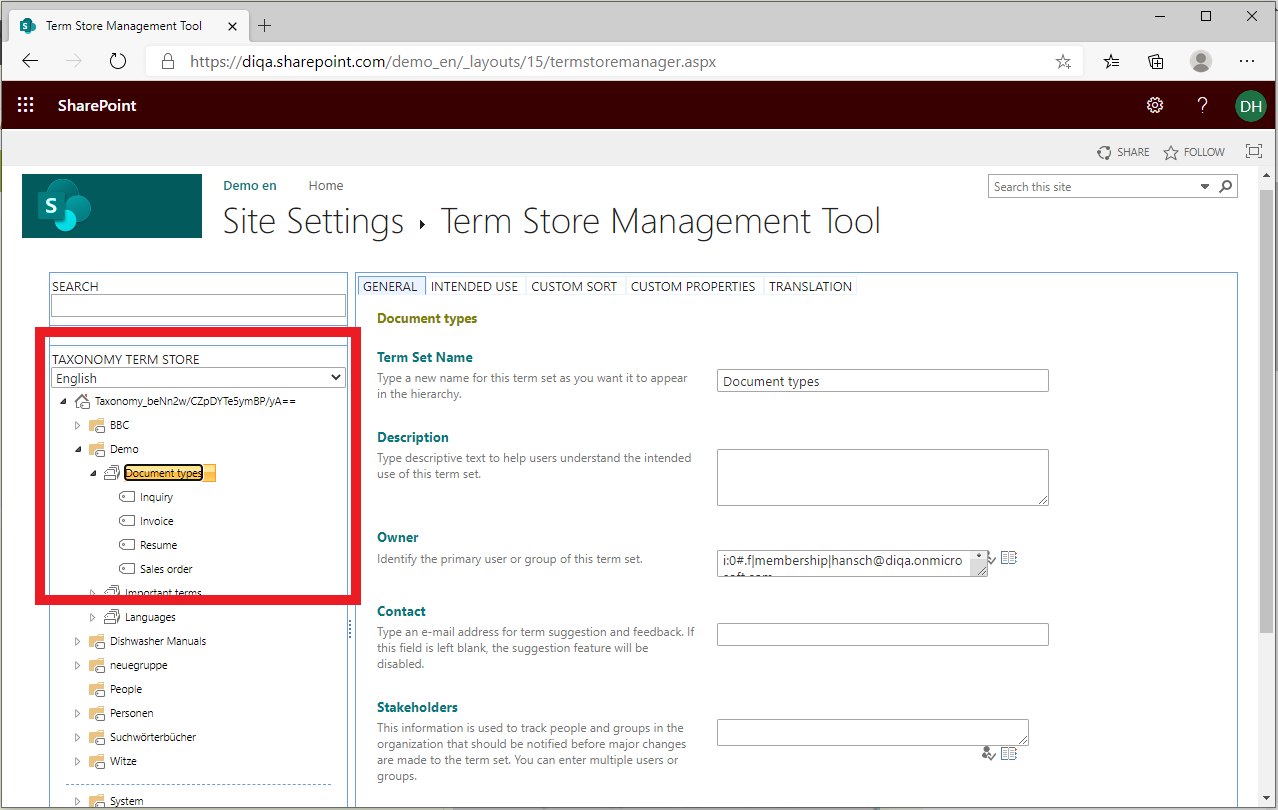
| 17:36, 28 September 2020 | Create termset.png (file) |  |
78 KB | 1. Open the termstore manager (in the site settings) 2. Create a new termset, named "document types" 3. Create a term for each document type that you keep in your document library. | 1 |
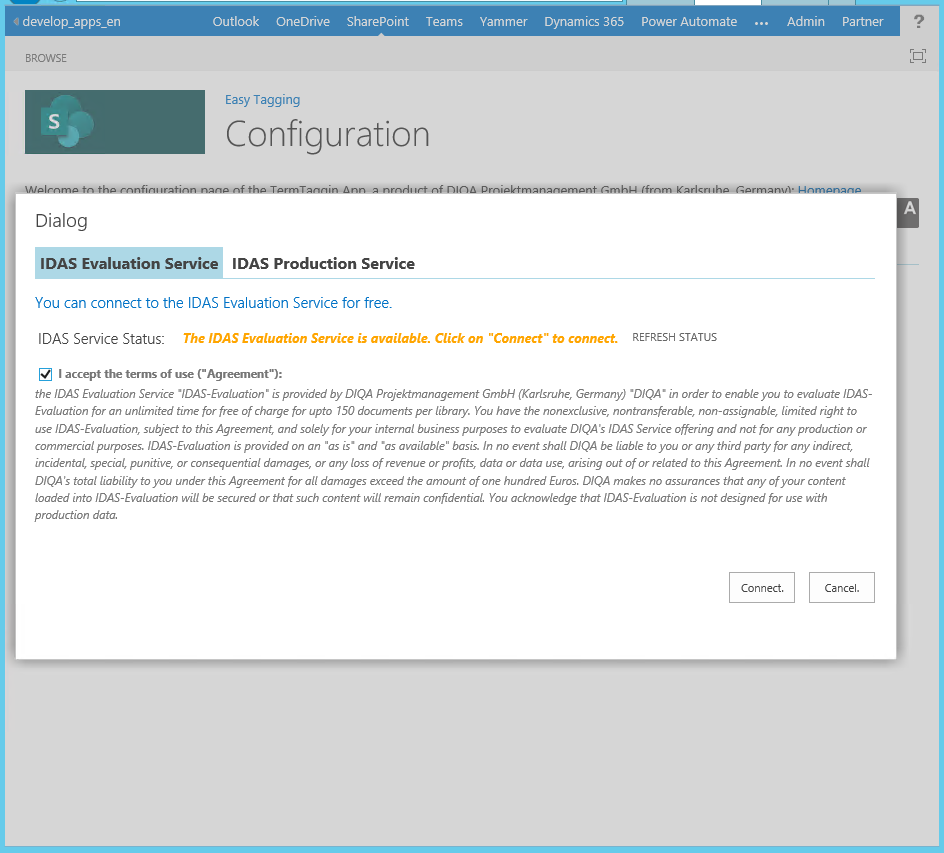
| 13:08, 29 September 2020 | Connect2.png (file) |  |
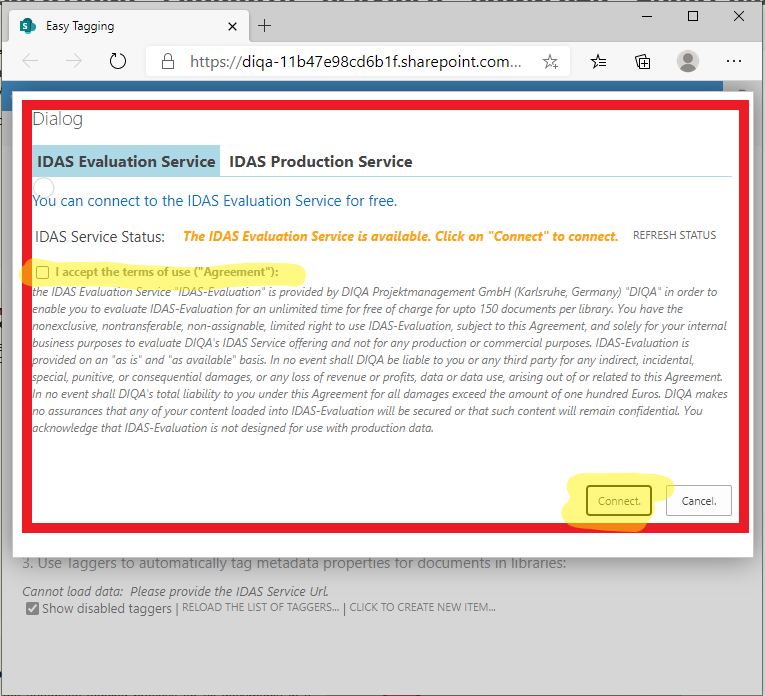
78 KB | 1. In the connection dialog: select the "IDAS Evaluation Service" tab 2. Click on "I accept the terms of use" tick box 3. If the service status says "IDAS evaluation service is available", then click on the "connect" button. If the status says somethin... | 1 |
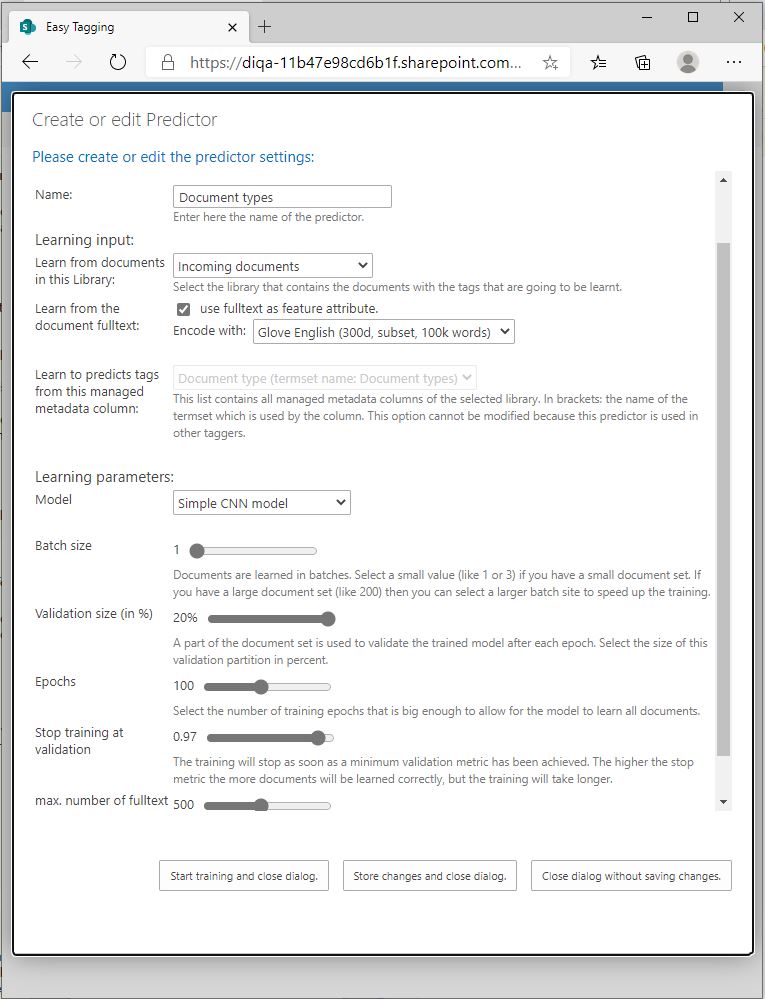
| 13:49, 29 September 2020 | Create predictor.JPG (file) |  |
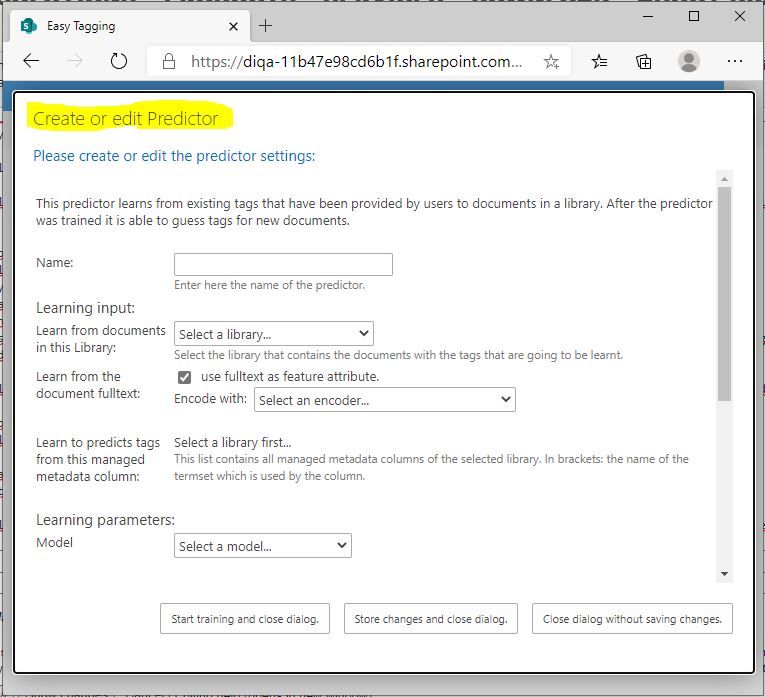
79 KB | 1. After you have created a connection to the IDAS Evaluation service you can setup a predictor which learns to tag documents from your examples. 2. In the (now empty) list of predictors click on the link: "Click to create new item". 3. In the selectio... | 1 |
| 17:39, 29 September 2020 | Create search center.JPG (file) |  |
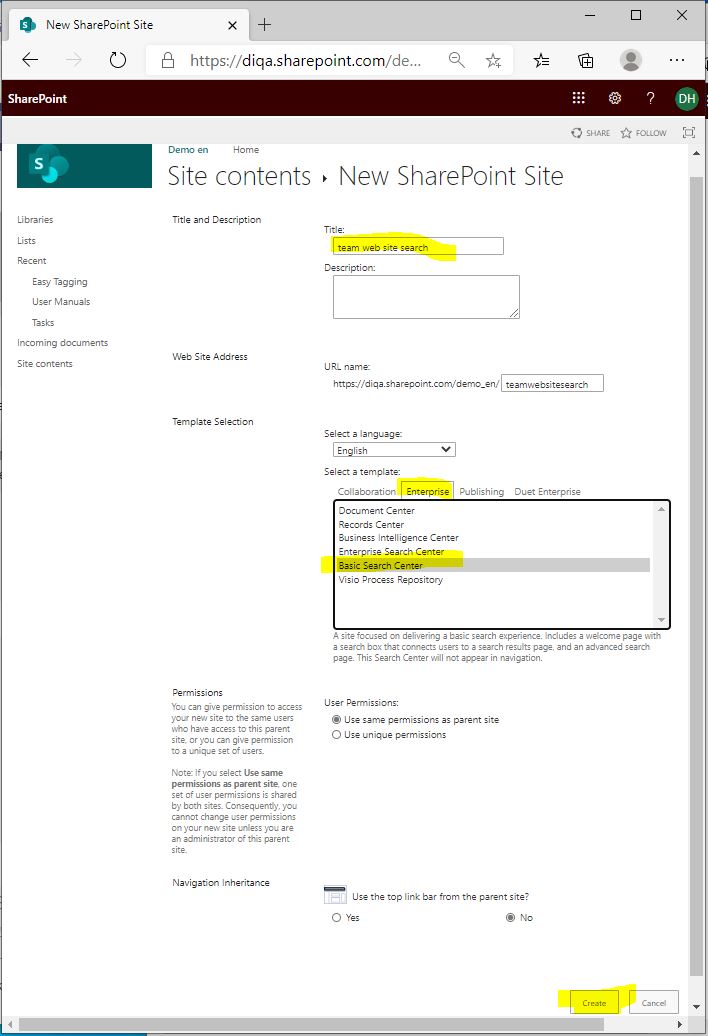
83 KB | 1. Open the contents of your Sharepoint site and click on "subsites". 2. Create a new sub site by clicking on the "New" action link. 3. A form opens where you specify the new sub site. 4. In the template field: select "Enterprise/Basic Search Center".... | 1 |
| 10:02, 8 April 2021 | Adminconsent new.PNG (file) |  |
86 KB | 1 | |
| 09:55, 8 April 2021 | Permissions new.PNG (file) |  |
86 KB | 1 | |
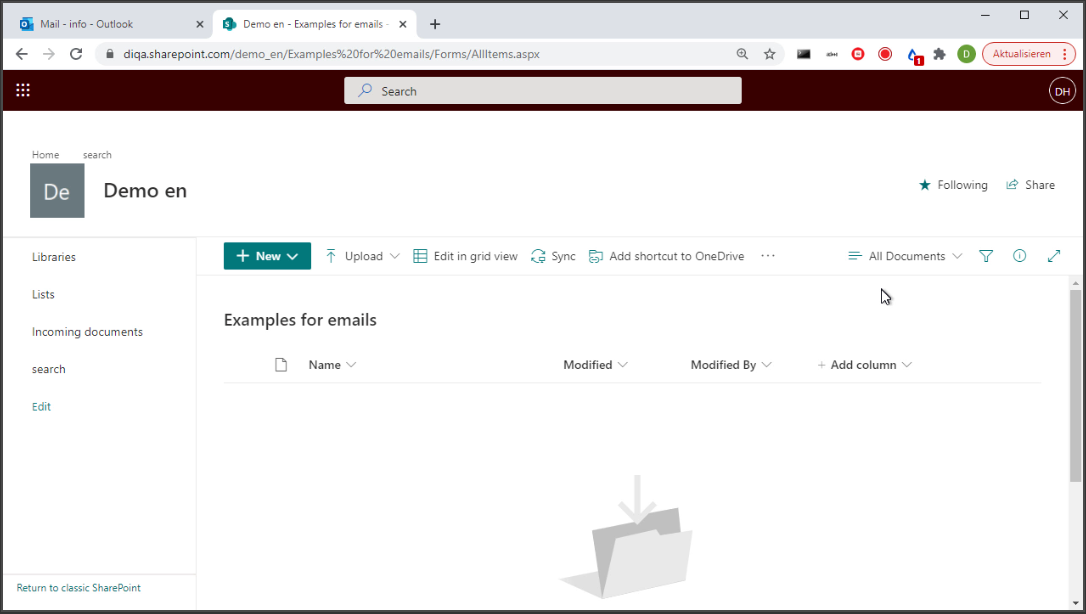
| 14:29, 10 May 2021 | Emailslib1.PNG (file) |  |
87 KB | 1 | |
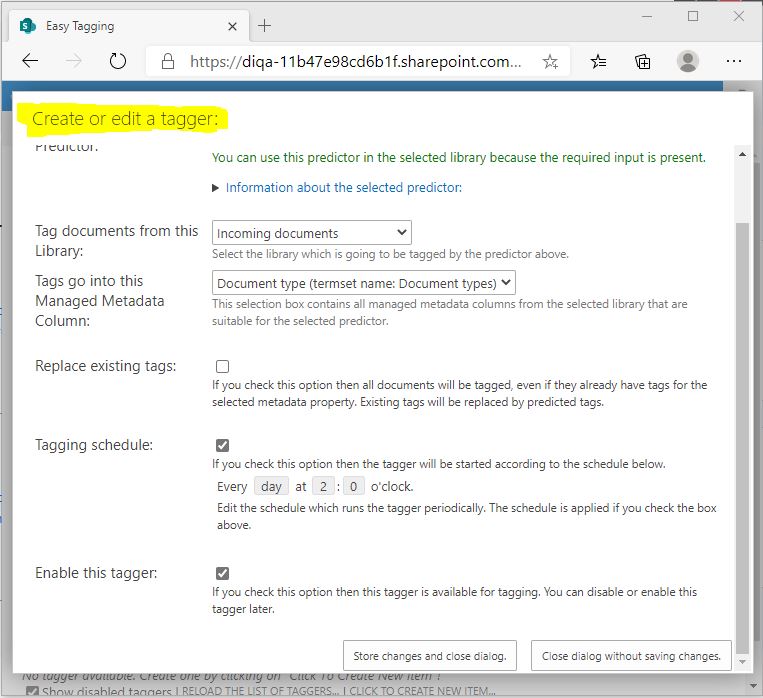
| 15:13, 29 September 2020 | Create tagger.JPG (file) |  |
88 KB | 1. As soon as the training of the predictor has completed, you can enable the predictor by clicking on the "enable" action link 2. Click on "OK" in the prompt that asks you if you want to create a tagger. 3. The "Create a tagger" form opens. 4. You can... | 1 |
| 13:49, 4 November 2020 | Start learning wizard.JPG (file) |  |
94 KB | 1 | |
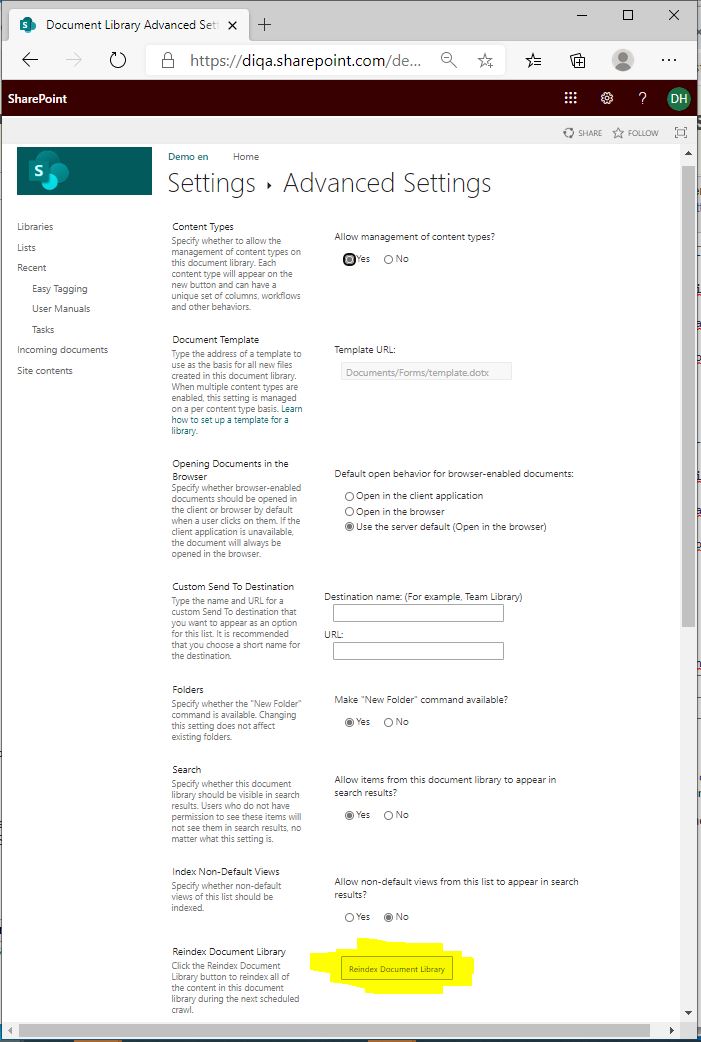
| 18:01, 29 September 2020 | Library settings.JPG (file) |  |
95 KB | 1. Opent the settings of your library 2. Click on "re-index document library" 3. Click on "Ok" to close the form | 1 |
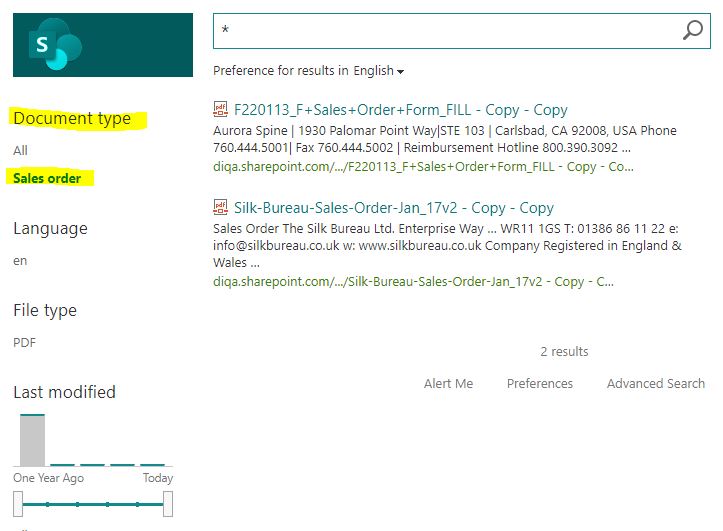
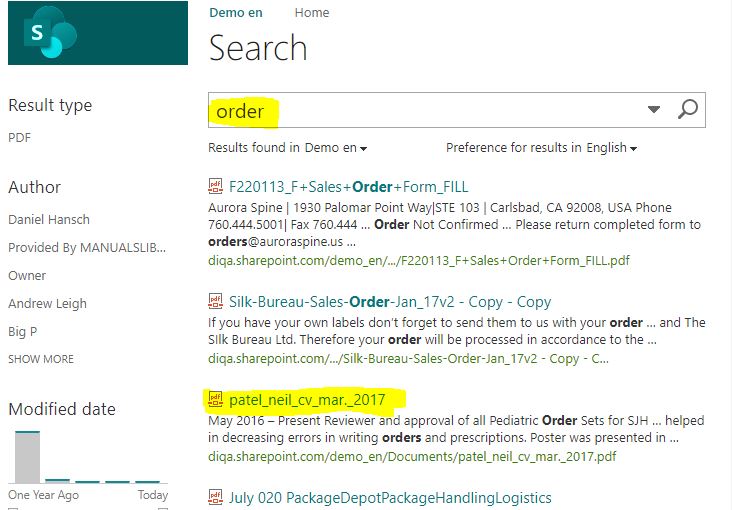
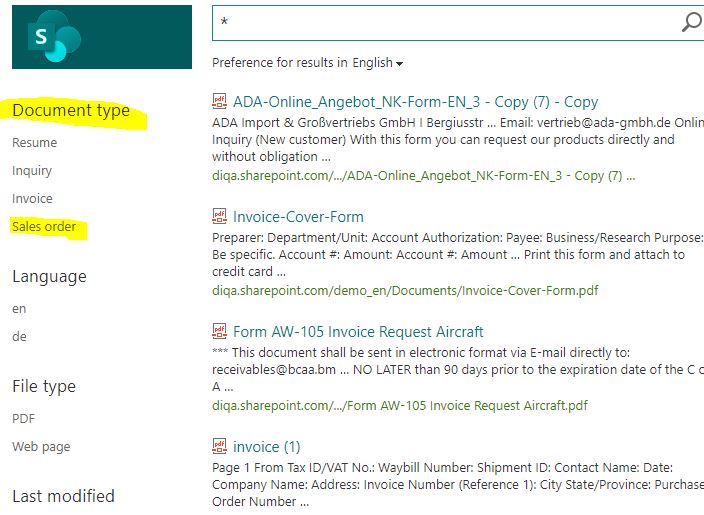
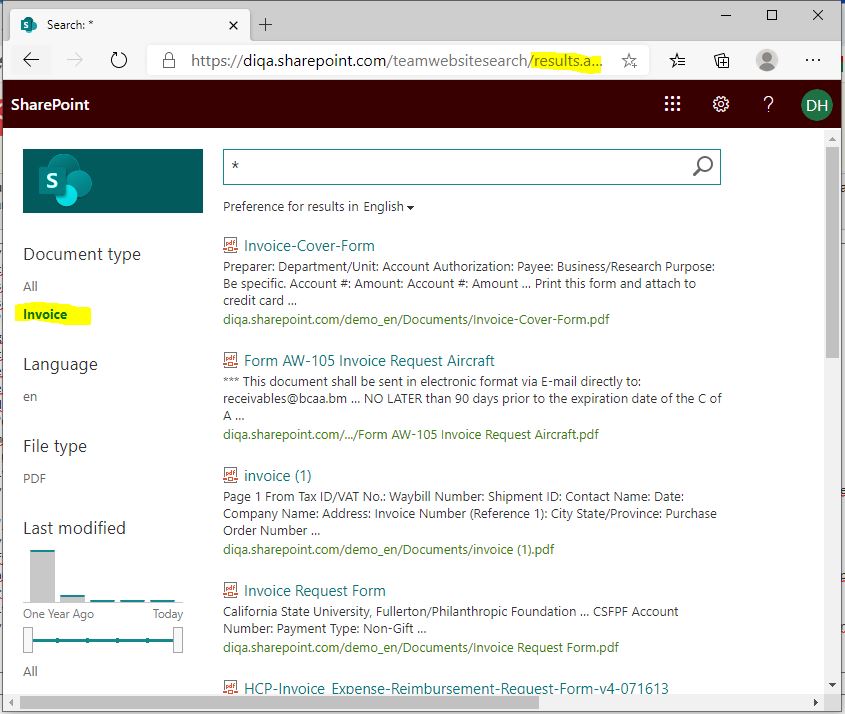
| 19:31, 29 September 2020 | Searchresults.JPG (file) |  |
98 KB | 1. Open the search center 2. Enter "*" as search string and submit the query 3. Inspect the refiner values: they should include your document types 4. Click on a refiner value, like "invoice", in order to restrict your search results to contain only... | 1 |
| 15:24, 29 September 2020 | Create perdictor2.jpeg (file) |  |
110 KB | 1. After you have created a connection to the IDAS Evaluation service you can setup a predictor which learns to tag documents from your examples. 2. In the (now empty) list of predictors click on the link: "Click to create new item". 3. In the sele... | 1 |
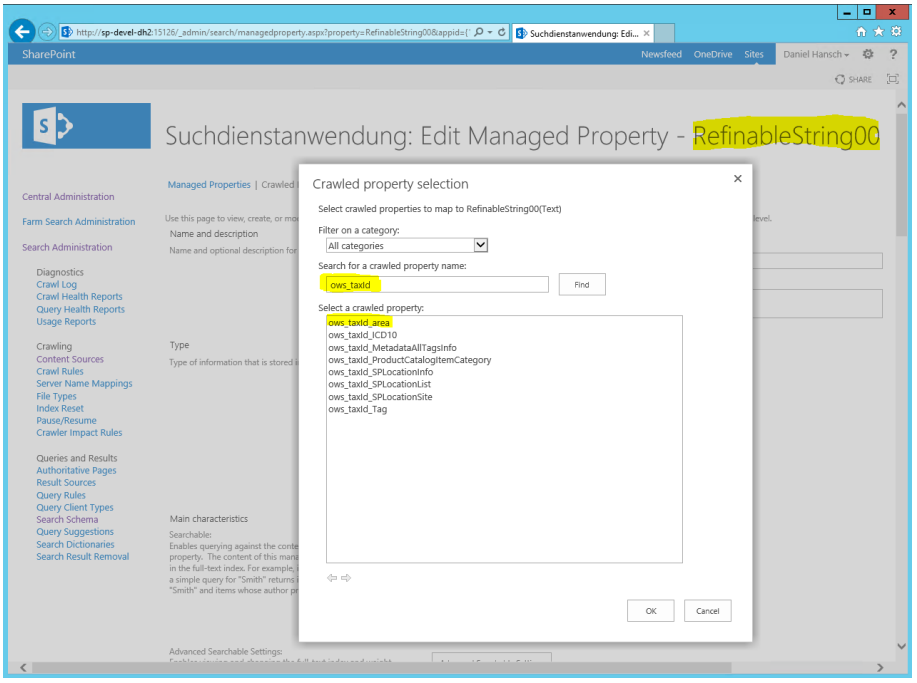
| 14:07, 6 May 2021 | Refinablestring mapping.PNG (file) |  |
113 KB | 1 | |
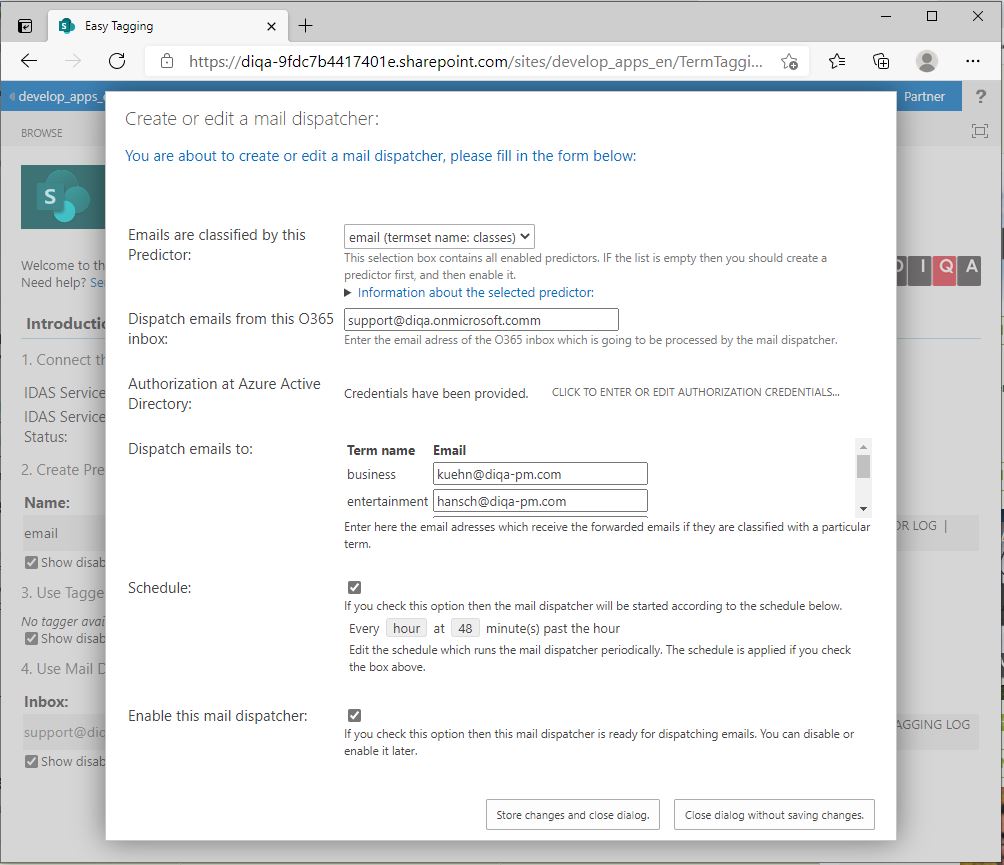
| 15:22, 9 March 2021 | Maildispatcher.JPG (file) |  |
119 KB | 1 | |
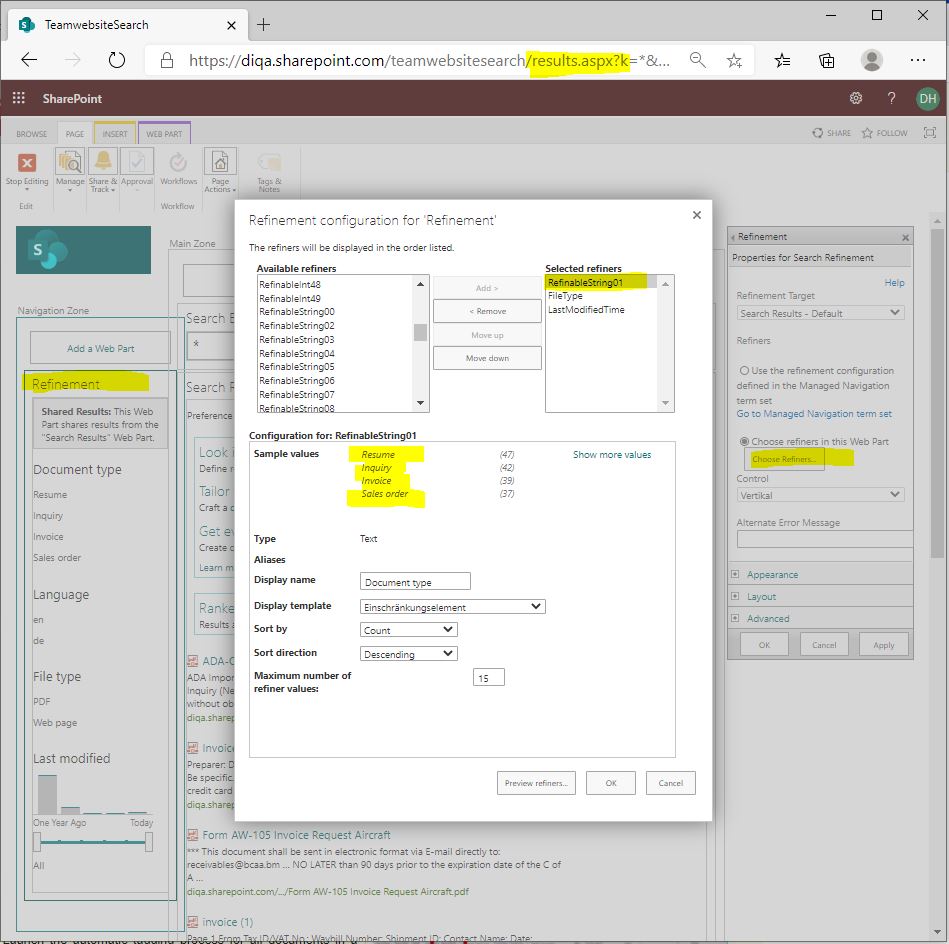
| 19:23, 29 September 2020 | Search refiner.JPG (file) |  |
120 KB | 1. Open the search center 2. Open the search results page (named "results.aspx") 3. Click on "Edit page" 4. In the page edit view: open the property settings of the Refinement webpart 5. Click on the button "Choose refiners" 6. In the "refinement... | 1 |
First page |
Previous page |
Next page |
Last page |