File:Create tagger.JPG
From DIQA-Homepage
Revision as of 15:13, 29 September 2020 by WikiSysop (talk | contribs) (1. As soon as the training of the predictor has completed, you can enable the predictor by clicking on the "enable" action link 2. Click on "OK" in the prompt that asks you if you want to create a tagger. 3. The "Create a tagger" form opens. 4. You can...)

Size of this preview: 655 × 599 pixels. Other resolutions: 262 × 240 pixels | 763 × 698 pixels.
Original file (763 × 698 pixels, file size: 88 KB, MIME type: image/jpeg)
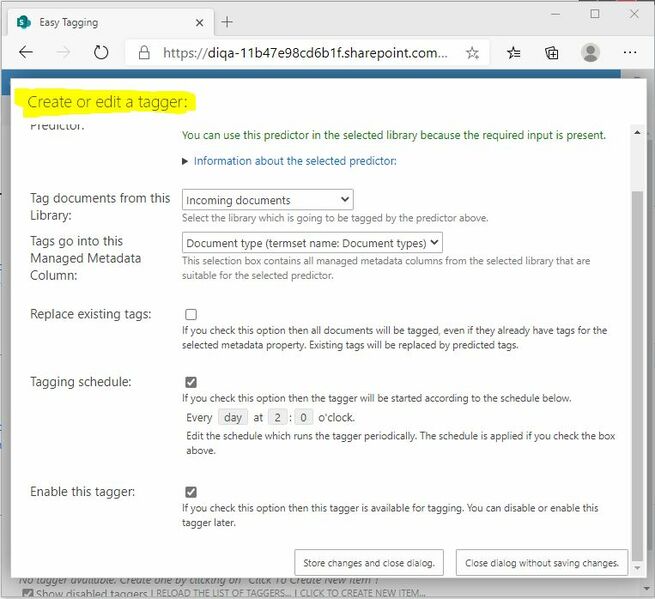
1. As soon as the training of the predictor has completed, you can enable the predictor by clicking on the "enable" action link 2. Click on "OK" in the prompt that asks you if you want to create a tagger. 3. The "Create a tagger" form opens. 4. You can keep all default settings in the form. 5. Tick off the "Tagging Schedule" box if you don't want to have this tagger to automatically process new documents per a schedule. 6. Click on "Store changes" to create the new tagger.
File history
Click on a date/time to view the file as it appeared at that time.
| Date/Time | Thumbnail | Dimensions | User | Comment | |
|---|---|---|---|---|---|
| current | 15:13, 29 September 2020 |  | 763 × 698 (88 KB) | WikiSysop (talk | contribs) | 1. As soon as the training of the predictor has completed, you can enable the predictor by clicking on the "enable" action link 2. Click on "OK" in the prompt that asks you if you want to create a tagger. 3. The "Create a tagger" form opens. 4. You can... |
- You cannot overwrite this file.
File usage
There are no pages that link to this file.