Difference between revisions of "Easy Tagging for SharePoint online/Manual/Authorize at Azure AD"
(Created page with "{{Seite |Titel=Easy Tagging App for Sharepoint online |Kategorie=Product |Image=EasyTaggingBannern.png |Verlauf= |Pfad=Main Page > Products > Easy_Tagging_for_SharePoint...") |
|||
| Line 1: | Line 1: | ||
{{Seite | {{Seite | ||
|Titel=Easy Tagging App for Sharepoint online | |Titel=Easy Tagging App for Sharepoint online | ||
| − | |Kategorie= | + | |Kategorie=Manual |
|Image=EasyTaggingBannern.png | |Image=EasyTaggingBannern.png | ||
|Verlauf= | |Verlauf= | ||
| − | |Pfad=[[Main Page]] > Products > [[Easy_Tagging_for_SharePoint_online|Easy Tagging for SharePoint online]] | + | |Pfad=[[Main Page]] > Products > [[Easy_Tagging_for_SharePoint_online|Easy Tagging for SharePoint online]] > User Manual > [[Authorize_at_Azure_AD|Authorize at Azure Active Directory]] |
|Keywords=SharePoint, o365, office 365, auto tagging | |Keywords=SharePoint, o365, office 365, auto tagging | ||
|SEO-Description=The Easy Tagging App for SharePoint online greatly reduces the time to provide large numbers of documents with consistent tags. | |SEO-Description=The Easy Tagging App for SharePoint online greatly reduces the time to provide large numbers of documents with consistent tags. | ||
| Line 11: | Line 11: | ||
<div class="row"> | <div class="row"> | ||
<div class="col-xs-12 col-md-8 col-lg-9 col-xl-10"> | <div class="col-xs-12 col-md-8 col-lg-9 col-xl-10"> | ||
| − | |||
| − | |||
| − | |||
| − | |||
| − | |||
| − | |||
| − | |||
| − | |||
| − | |||
| − | |||
| − | |||
| − | |||
| − | |||
| − | |||
| − | |||
| − | |||
| − | |||
| − | |||
| − | |||
| − | |||
| − | |||
| − | |||
| − | |||
| − | |||
| − | |||
<p> | <p> | ||
The following steps assume that you have Sharepoint Online/Office 365 and a library that contains at least dozens of documents or scanned documents (pdf or image formats). If you are familiar with certain configuration aspects of Sharepoint then you will need 30 minutes to go them through in your tenant. If you require assistance then we are happy to help!</p> | The following steps assume that you have Sharepoint Online/Office 365 and a library that contains at least dozens of documents or scanned documents (pdf or image formats). If you are familiar with certain configuration aspects of Sharepoint then you will need 30 minutes to go them through in your tenant. If you require assistance then we are happy to help!</p> | ||
| − | |||
| − | |||
| − | |||
| − | |||
| − | |||
| − | |||
| − | |||
| − | |||
| − | |||
| − | |||
| − | |||
| − | |||
| − | |||
| − | |||
| − | |||
| − | |||
| − | |||
| − | |||
<div class="row funktionen-row"> | <div class="row funktionen-row"> | ||
<!-- --><div class="col-md-6 col-md-border funktionen" style="text-align: justify; "> | <!-- --><div class="col-md-6 col-md-border funktionen" style="text-align: justify; "> | ||
| Line 225: | Line 182: | ||
<!-- --><div class="col-md-6 col-md-border funktionen imageExpand" style="text-align: justify; >[[File:Searchresults.JPG|center|middle]]</div> | <!-- --><div class="col-md-6 col-md-border funktionen imageExpand" style="text-align: justify; >[[File:Searchresults.JPG|center|middle]]</div> | ||
</div> | </div> | ||
| − | + | </div> | |
==What's next?== | ==What's next?== | ||
* Add refiners for the document language like: english, french, german, spanisch | * Add refiners for the document language like: english, french, german, spanisch | ||
| Line 237: | Line 194: | ||
|Placeholder= | |Placeholder= | ||
}} | }} | ||
| − | + | </div> | |
<div class="hideSM col-md-4 col-lg-3 col-xl-2"> | <div class="hideSM col-md-4 col-lg-3 col-xl-2"> | ||
{{Linkbox | {{Linkbox | ||
Revision as of 14:42, 10 March 2021
The following steps assume that you have Sharepoint Online/Office 365 and a library that contains at least dozens of documents or scanned documents (pdf or image formats). If you are familiar with certain configuration aspects of Sharepoint then you will need 30 minutes to go them through in your tenant. If you require assistance then we are happy to help!
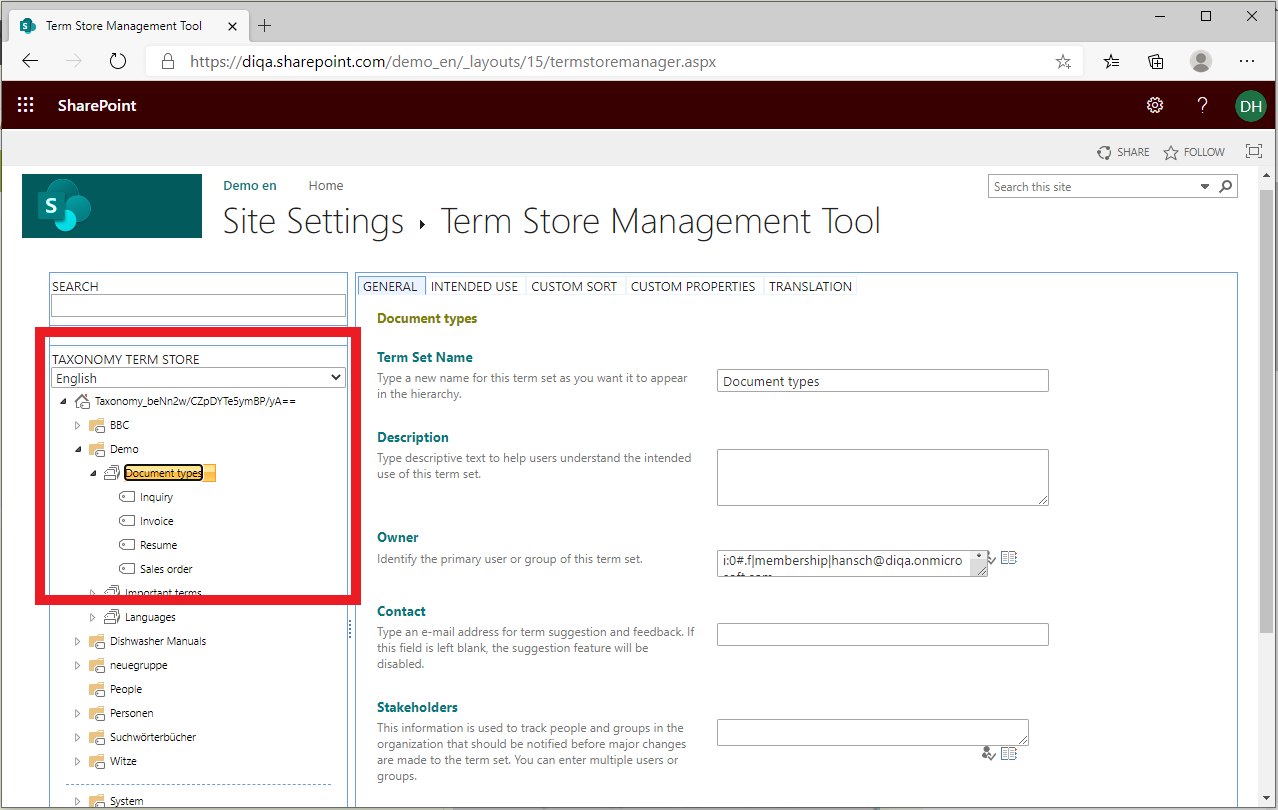
1. Create a termset with your document types
- Open the termstore manager (from the site settings)
- Create a new termset, named "document types"
- Create a term for each document type that you keep in your document library, e.g. inquiry, invoice, sales order, resume
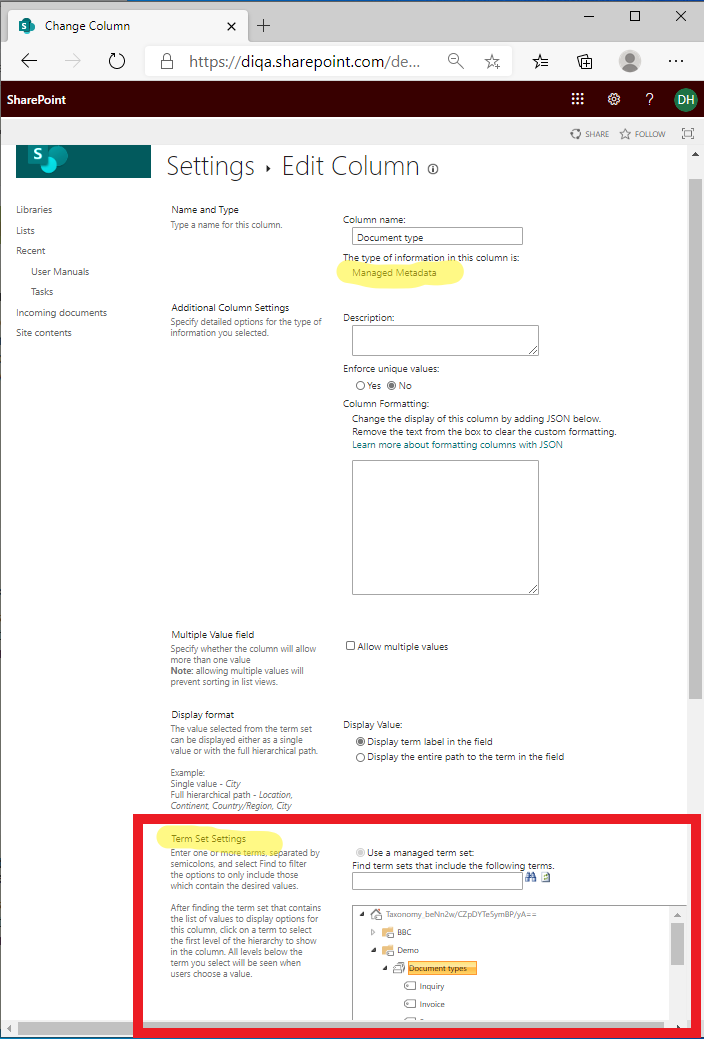
2. Create a column for your document library that contins the document types
- Open the document library
- Open the library advanced settings
- Click on "create column"
- Enter the name of the new library column, e.g. "document type"
- Select "managed metadata" as type
- In the term set settings: select the termset "document type" (from the step above)
- Click on "Save" to close the form
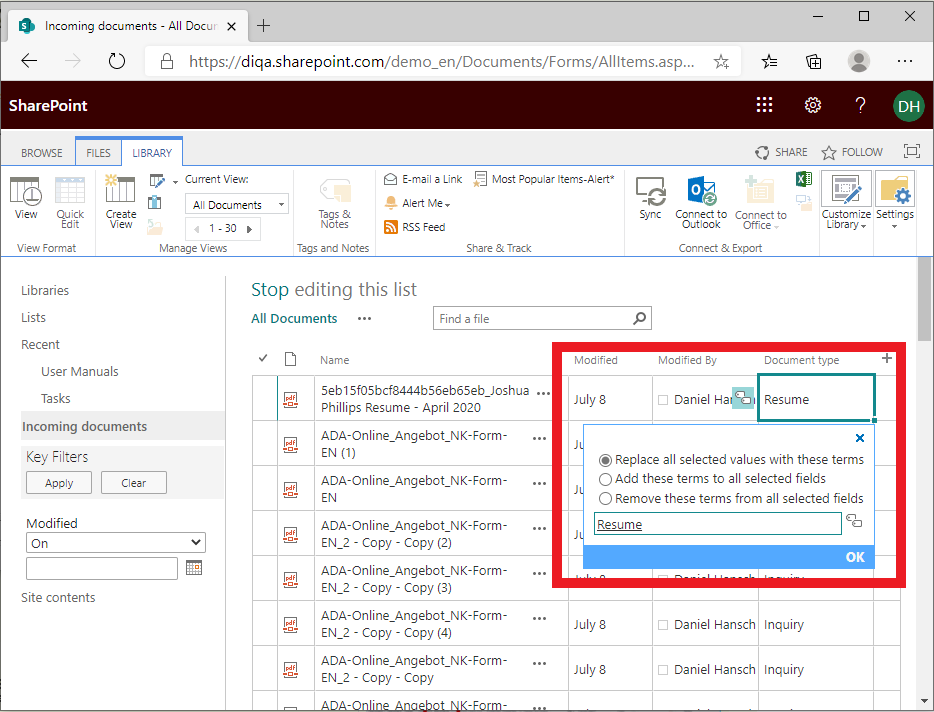
3. Manually tag a couple of documents as examples (not all!)
- Open the library settings and add the new column "Document types" to the default view of the library
- Open the "Quick Edit" view of the library.
- Populate the field "Document types" with meaningful values for a couple of documents per document type. It is not necessary to provide each document with a tag, but the more examples you provide, the better the results will be. You should achieve a coverage of 20% of all documents per document type (and at least 10 examples per document type).
You have now prepared everything required to teach the "Easy Tagging App" about your way to tag. You can now carry on and install the Easy Tagging App and train the "Learn Tags"-predictor.
</p>
Step 2: Automatically tag all your documents
1. Install the Easy Tagging App from the App Source (free evaluation!)
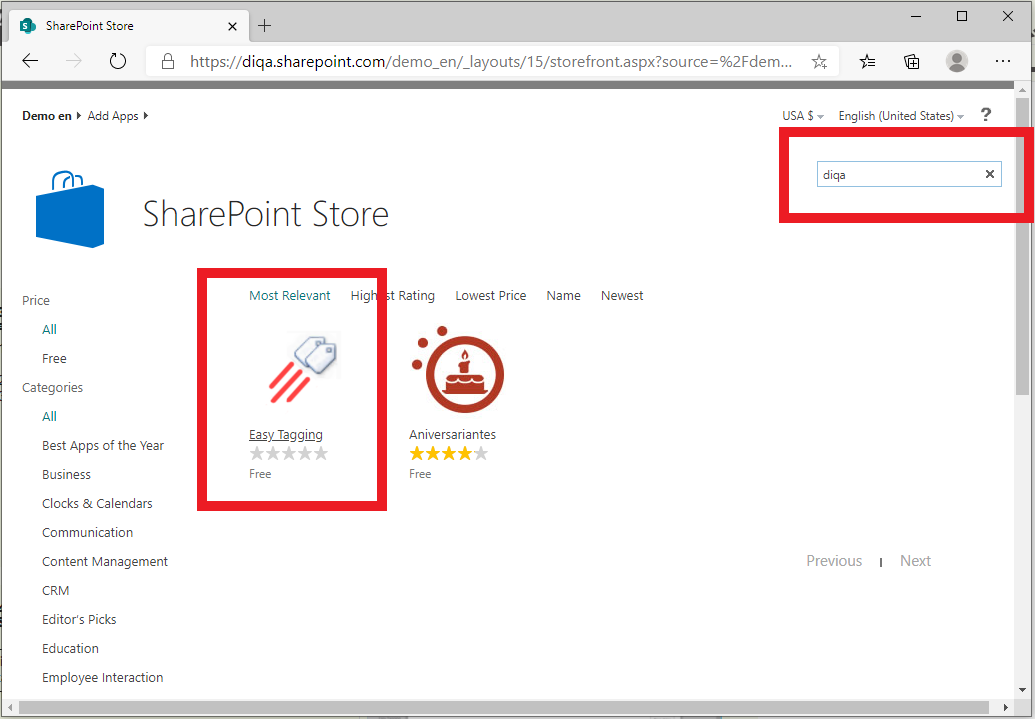
- Open the site settings and click on "Add an App"
- Click on "Sharepoint Store"
- In the Sharepoint Store: enter "diqa" as search term
- Click on the "Easy Tagging" card to initiate the installation.
- Direct link to the Microsoft App Store:
2. Launch the app and grant it the requested permissions
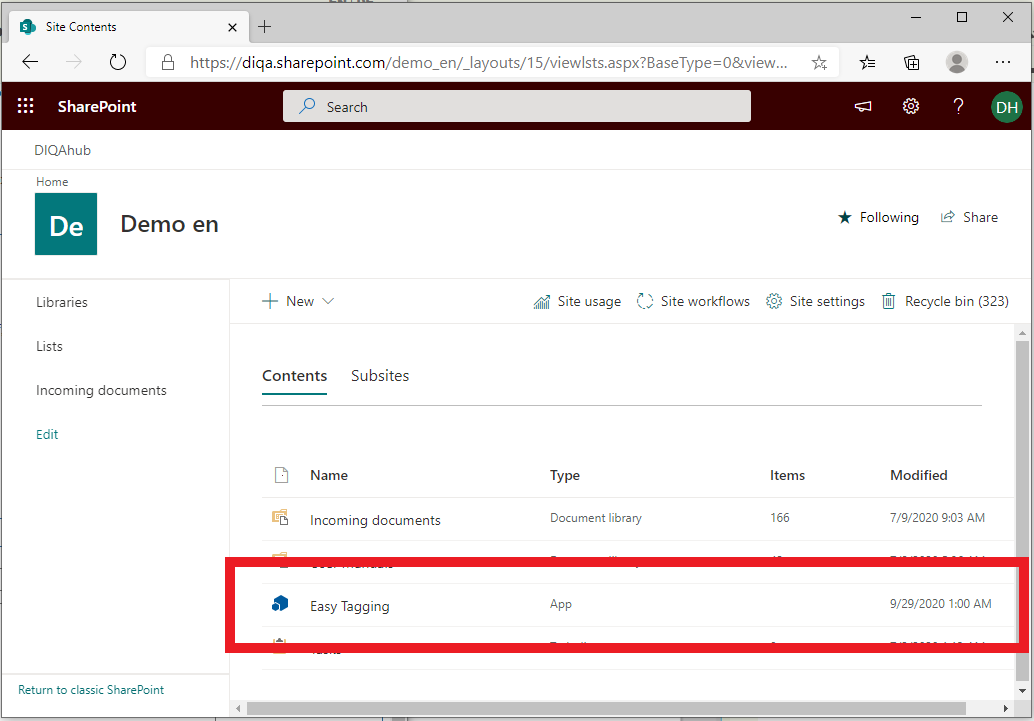
- Open the site contents again where you should find the newly installed Easy Tagging App
- Click on the App and grant it the requested permissions.
- The configuration page of the app opens in a new tab.
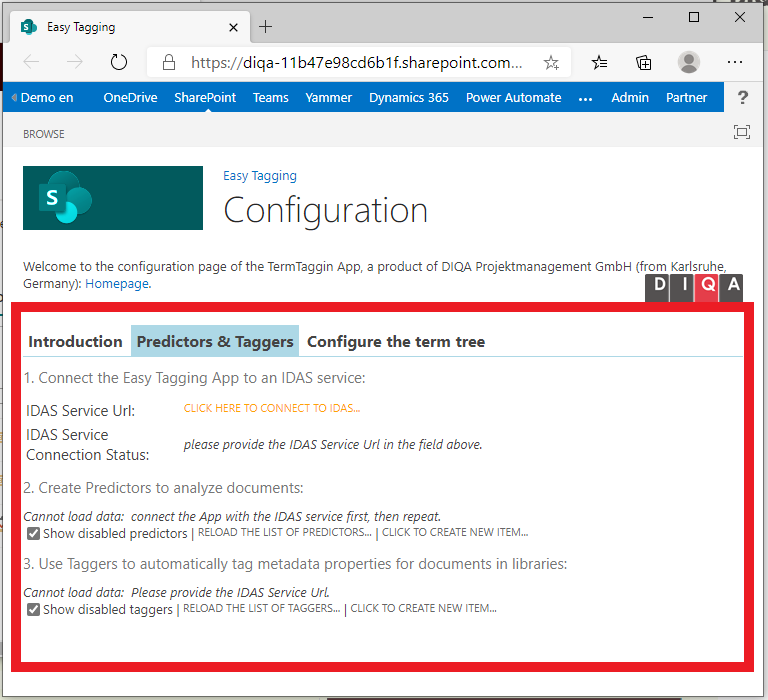
3. Connect the Easy Tagging App with the IDAS service (1/2)
- In the configuration page of the Easy Tagging App: click on the "Predictors & Taggers" tab
- Click on the link "Click here to connect to IDAS"
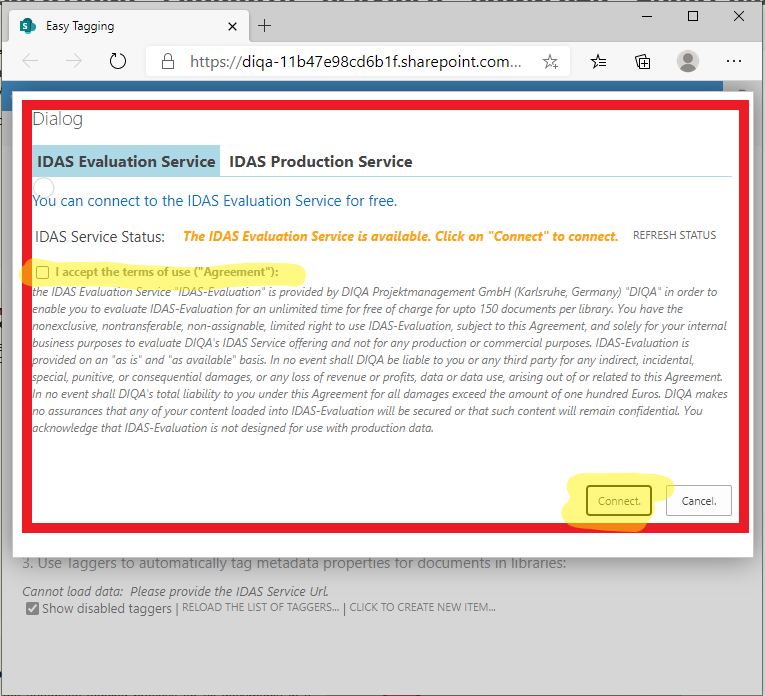
4. Connect the Easy Tagging App with the IDAS service (2/2)
- In the connection dialog: select the "IDAS Evaluation Service" tab
- Click on "I accept the terms of use" tick box
- If the service status says "IDAS evaluation service is available", then click on the "connect" button. If the status says something different: click on "refresh status".
- The dialog closes and you can setup a predictor.
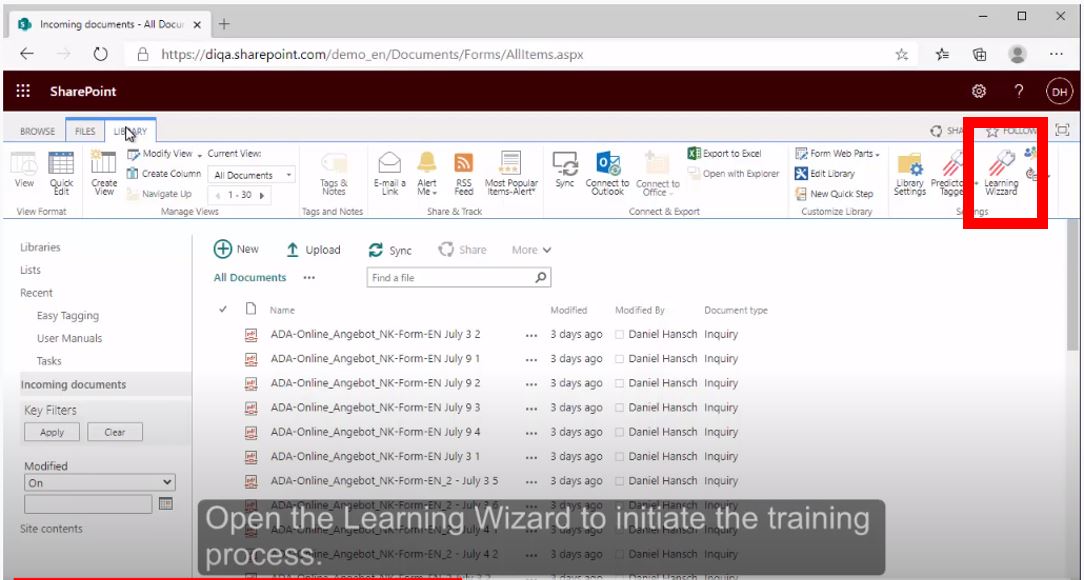
5. Launch the "Learning Wizard" in your library
- After you have created a connection to the IDAS Evaluation service you can launch the "Learning Wizard" which will guide you through the process to learn from your examples and to tag your documents.
- Return to your library and open the "Library Settings" ribbon.
- Click on the "Learning Wizard" icon which launches the wizard in a dialog.
- Go through the three steps:
- Click on "Click to start the wizard"
- Step 1: select the language that is used in most of the documents of the library. If you documents in other languages: just select english.
- Step 1: in the field "Learn to predict tags from this managed metadata column": select the "document types" column that you created in the earlier steps
- Step 2: your library is analysed for sufficient examples. If you don't have enough examples: please add further examples before you continue with the wizard.
- Step 3: select the column which will receive the document type tags: just keep the selection.
- Step 3: click on the link "Start Learning and Tagging".
- The learning and tagging processes are running in the background.
- You can inspect the progress in the library ribbon "Predictors + Taggers"
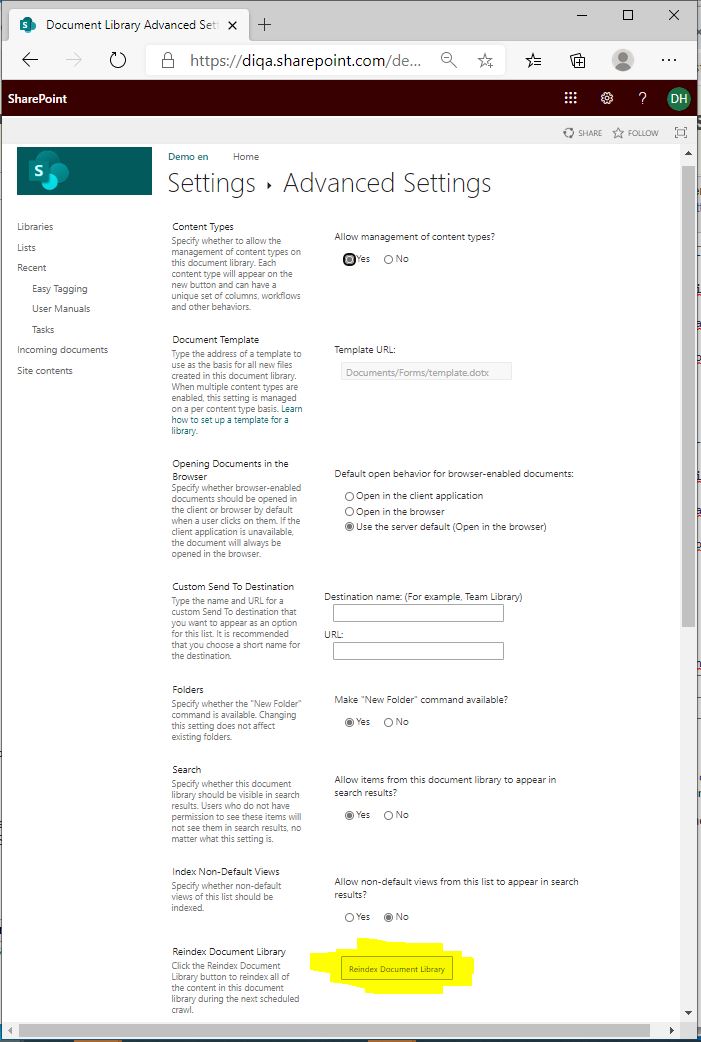
6. Important: re-index your document library
- Opent the settings of your library
- Click on "re-index document library"
- Click on "Ok" to close the form
Now all your documents in the library have been provided with tags, and the search index is being updated in the background. You can now carry on and setup the search page that uses these tags.
Step 3: Create a search center that includes the search refiners
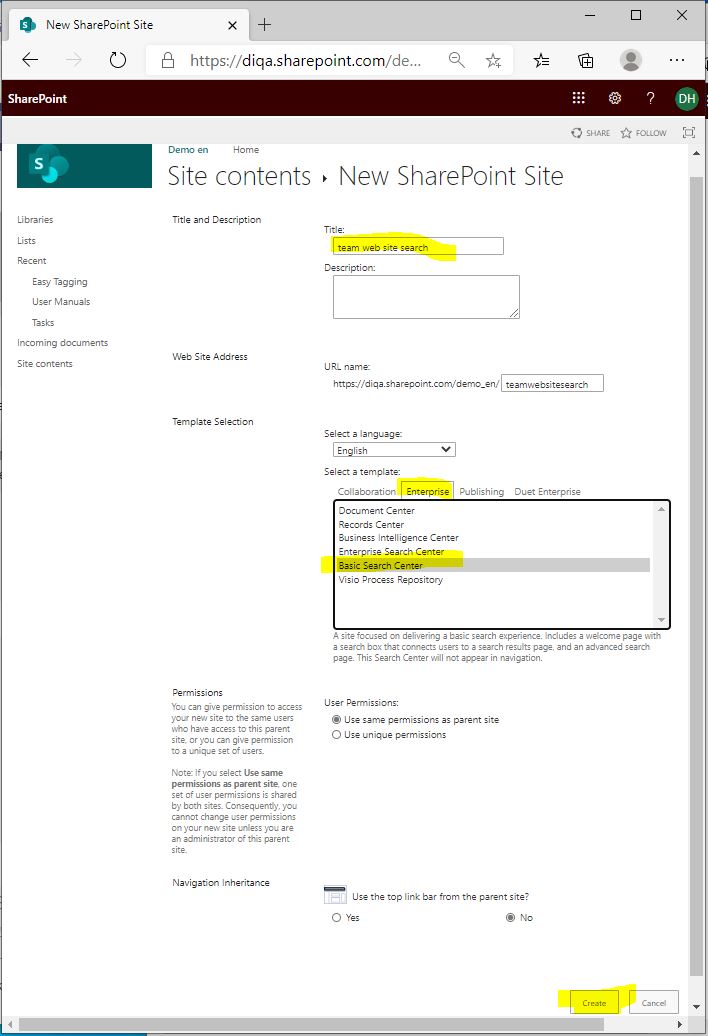
1. Create an Enterprise Search Center
- Open the contents of your Sharepoint site and click on "subsites".
- Create a new sub site by clicking on the "New" action link.
- A form opens where you specify the new sub site.
- In the template field: select "Enterprise/Basic Search Center".
- Click on "Create" to create the new seach center.
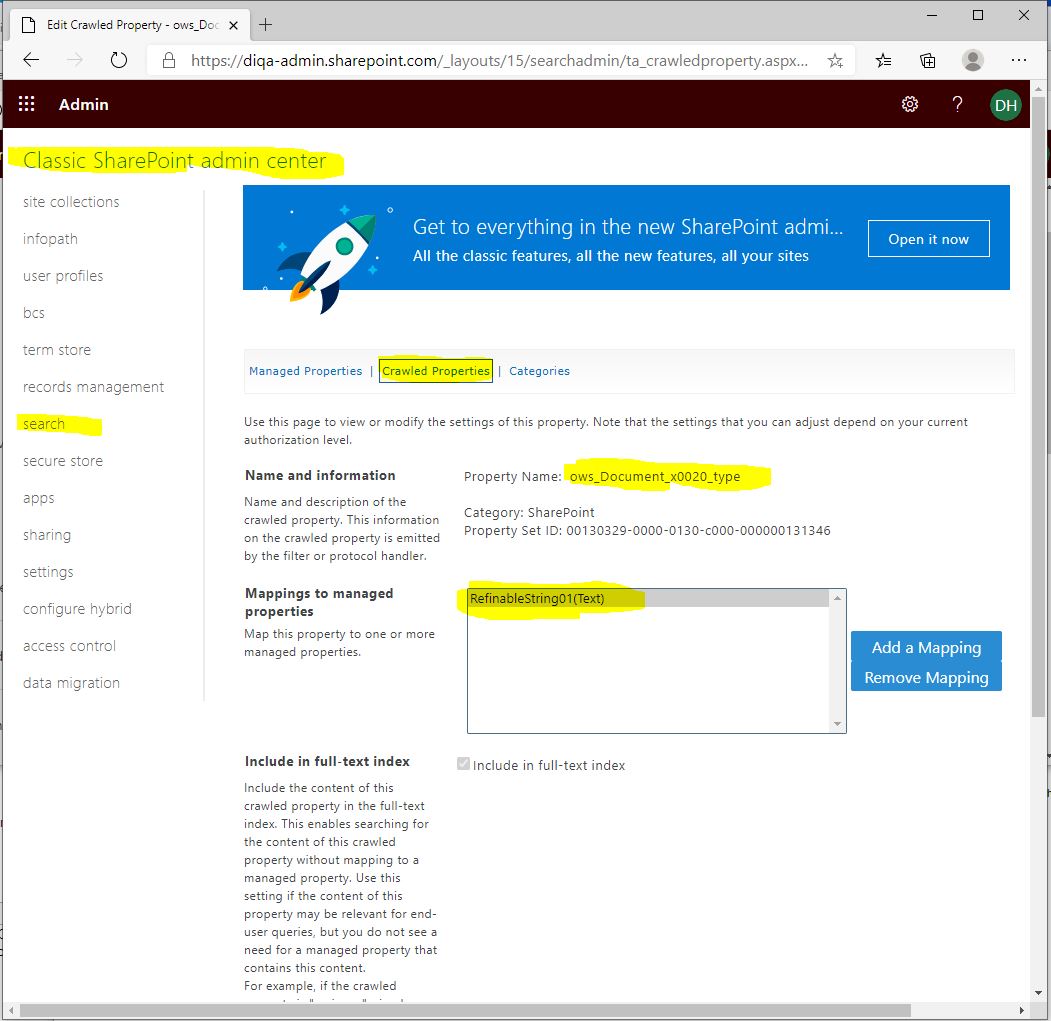
2. Adjust the search schema: map the crawled property to a refinable managed property
- Open the Sharepoint admin center for your tenant.
- Click on the "Search" section
- In the Search section: click on "Search schema"
- In the "Search schema" settings: activate the tab "Crawled properties"
- Search for all crawled properties that start with the string "ows_"
- Select the crawled property that relates to your "document type"-managed property, e.g. "ows_Document_x0020_type"
- Create a mapping to the managed property "RefinableString01" (or 00, or any other number).
- Save the settings.
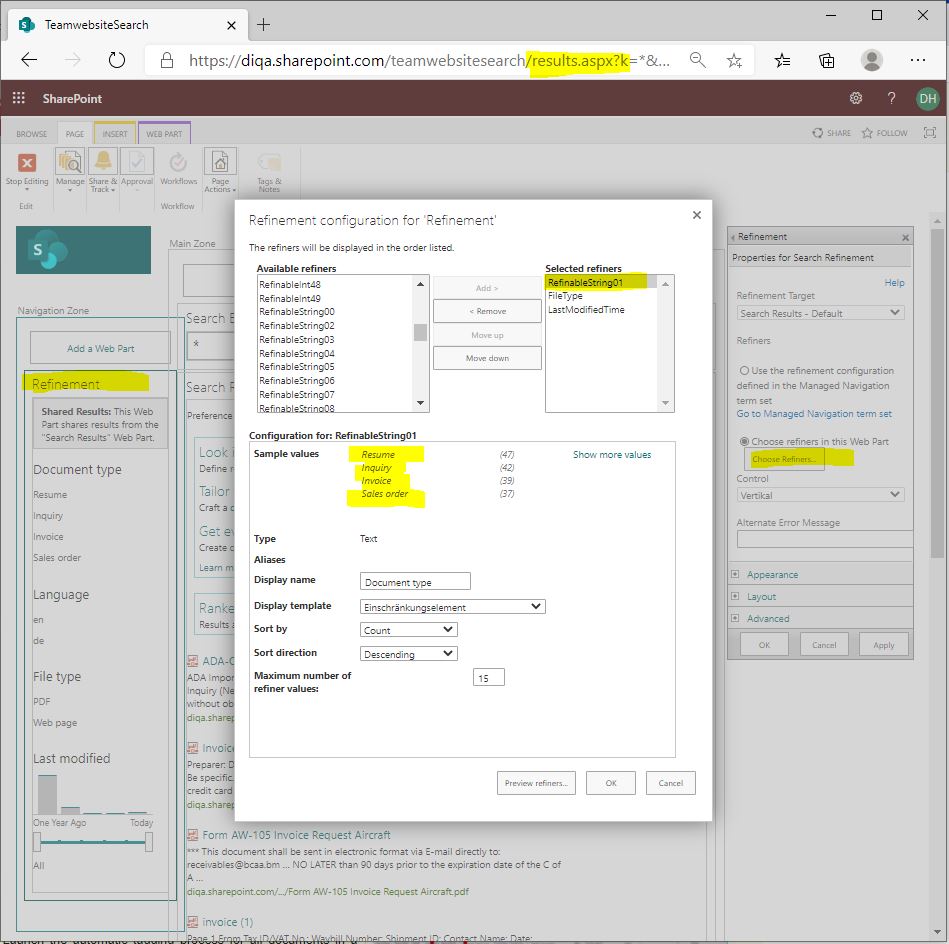
3. Add the new refiner to the search page
- Open the search center
- Open the search results page (named "results.aspx")
- Click on "Edit page"
- In the page edit view: open the property settings of the Refinement webpart
- Click on the button "Choose refiners"
- In the "refinement configuration" dialog: add the refinable managed propery
(from the search schema step), like: RefinableString00 (or 01 etc).
- You should see sample values that contain you document types.
- Click on "Ok" to add RefinableString00 to the refiner
- Save the modified properties of the webpart by clicking on "OK"
- Store the modified page.
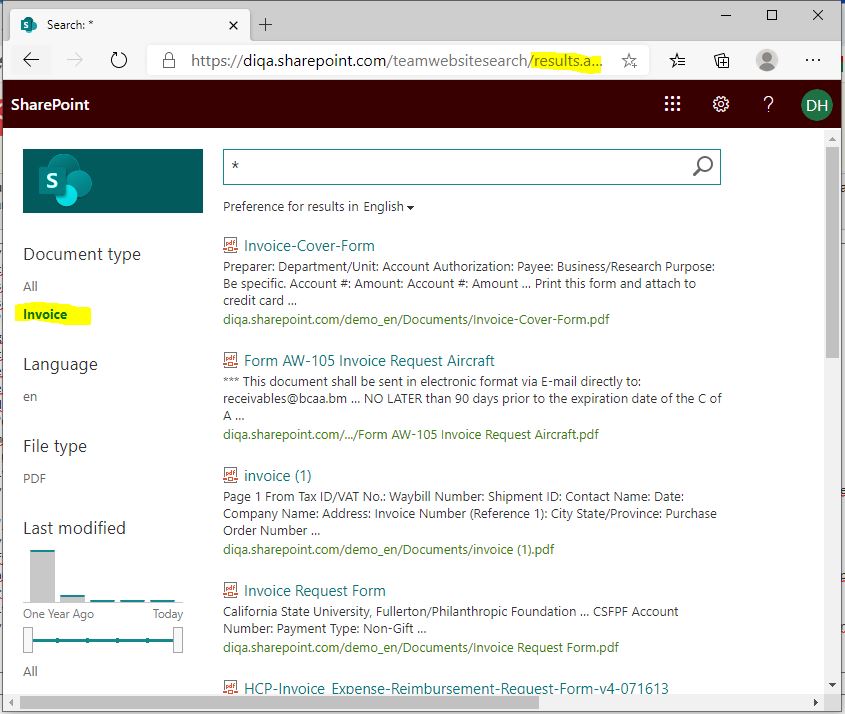
4. verify the search results
- Open the search center
- Enter "*" as search string and submit the query
- Inspect the refiner values: they should include your document types
- Click on a refiner value, like "invoice", in order to restrict your search results to contain only invoices and bills.
If the new refiner does not contain values then you have to wait until the Sharepoint online search engine has completed re-indexing your library. If still no values show up then you have to go back to your library settings and click on "re-index library".
</div>
What's next?
- Add refiners for the document language like: english, french, german, spanisch
- The Easy Tagging App has a built-in predictor that detects the language that is used in documents. You can simply use that predictor in a tagger to tag all your documents with the language. Similar to the steps in section 3 you would simply create another refiner that allows users to restrict their search results to certain languages.
- Add refiners for important words:
- The Easy Tagging App is able to identify important words from documents and store them in the termstore as a new termset. If you let the tagger tag your documents with them, then your users can use them to filter their search results.
Questions?
</div>

Dipl.-Wirtsch.-Inf.
Daniel Hansch
Machine Learning expert, software engineer, project manager
Tel.: +49-176 64078339
[email protected]
