Difference between revisions of "Blog/Boost document findability with tags in O365"
| Line 54: | Line 54: | ||
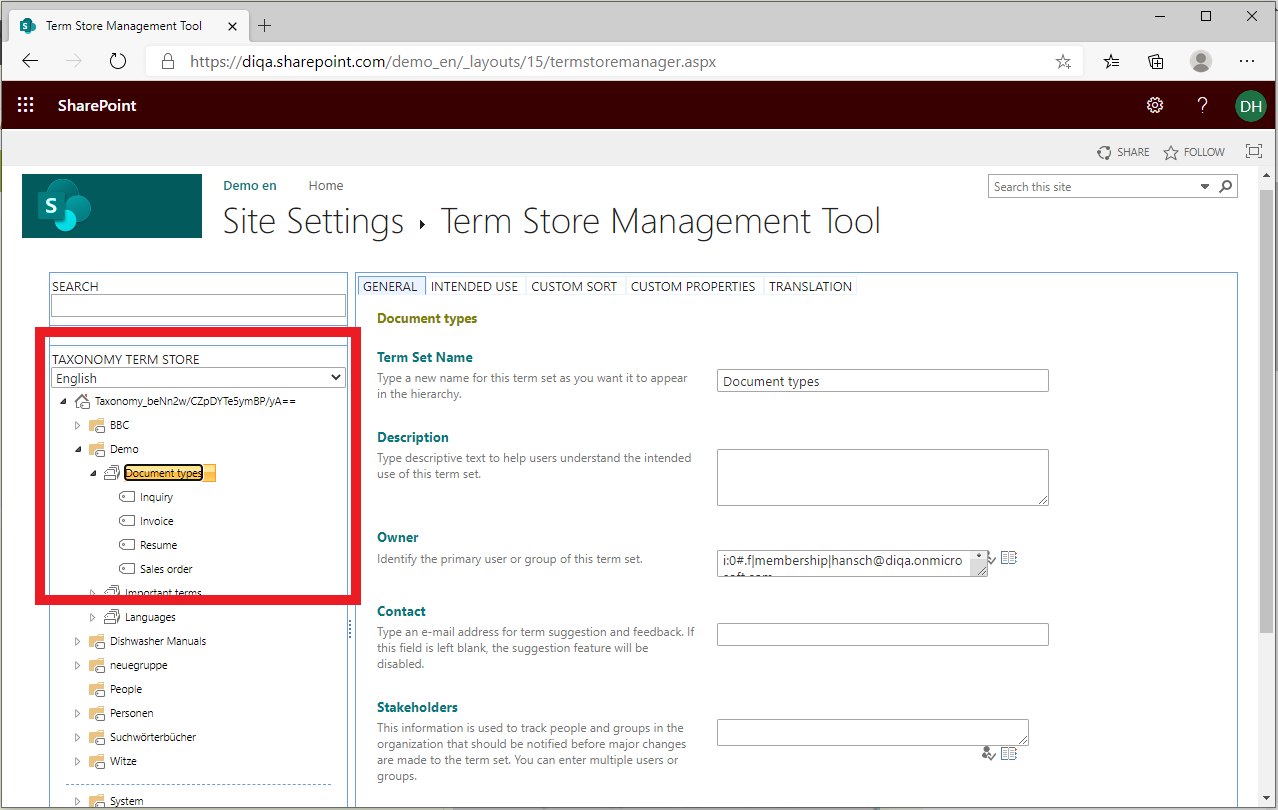
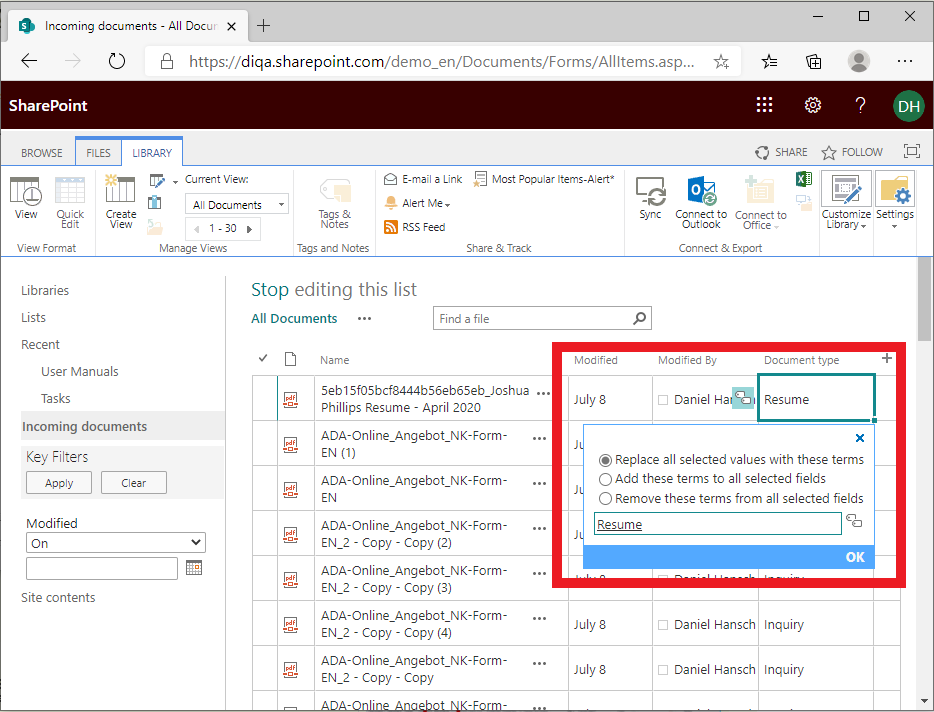
# Create a term for each document type that you keep in your document library, e.g. inquiry, invoice, sales order, resume | # Create a term for each document type that you keep in your document library, e.g. inquiry, invoice, sales order, resume | ||
<!-- --></div> | <!-- --></div> | ||
| − | <!-- --><div class="col-md-6 col-md-border funktionen imageExpand" style="text-align: justify; >[[File:Create_termset.png | + | <!-- --><div class="col-md-6 col-md-border funktionen imageExpand" style="text-align: justify; >[[File:Create_termset.png|center|middle]]</div> |
</div> | </div> | ||
<div class="row funktionen-row"> | <div class="row funktionen-row"> | ||
| Line 77: | Line 77: | ||
<big>You have now prepared everything required to teach the "Easy Tagging App" about your way to tag. You can now carry on and install the Easy Tagging App and train the "Learn Tags"-predictor.</big> | <big>You have now prepared everything required to teach the "Easy Tagging App" about your way to tag. You can now carry on and install the Easy Tagging App and train the "Learn Tags"-predictor.</big> | ||
<!-- --></div> | <!-- --></div> | ||
| − | <!-- --><div class="col-md-6 col-md-border funktionen imageExpand" style="text-align: justify; >[[File:Tagexample.png | + | <!-- --><div class="col-md-6 col-md-border funktionen imageExpand" style="text-align: justify; >[[File:Tagexample.png|center|middle]]</div> |
</div> | </div> | ||
</p> | </p> | ||
| Line 92: | Line 92: | ||
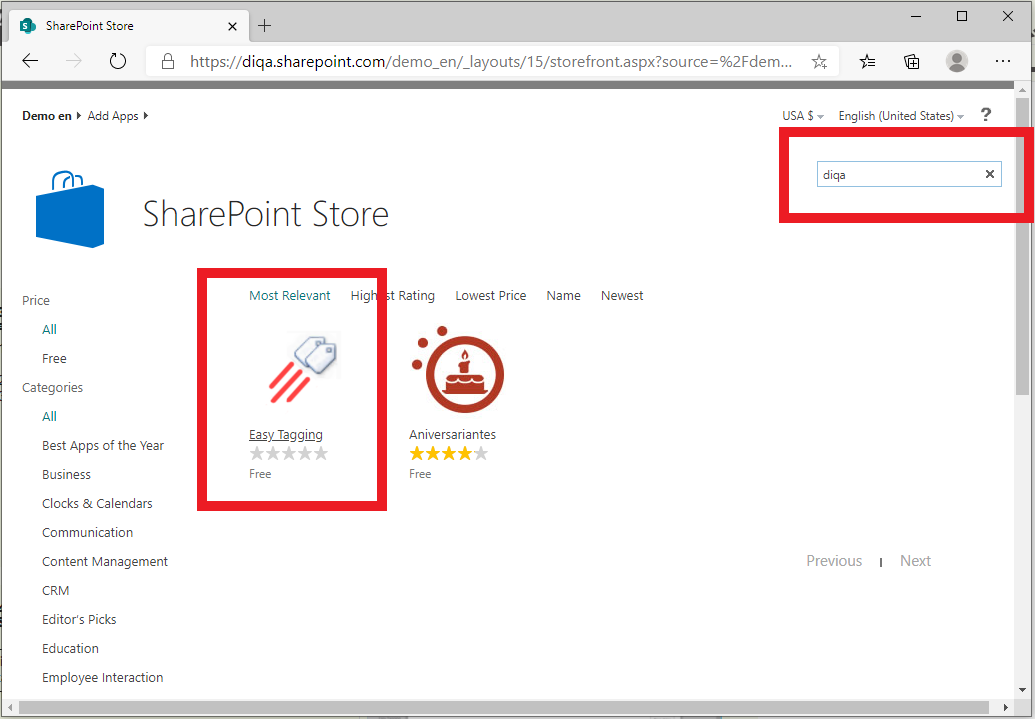
# Click on the "Easy Tagging" card to initiate the installation. | # Click on the "Easy Tagging" card to initiate the installation. | ||
<!-- --></div> | <!-- --></div> | ||
| − | <!-- --><div class="col-md-6 col-md-border funktionen imageExpand" style="text-align: justify; >[[File:Appstore.png | + | <!-- --><div class="col-md-6 col-md-border funktionen imageExpand" style="text-align: justify; >[[File:Appstore.png|center|middle]]</div> |
</div> | </div> | ||
<div class="row funktionen-row"> | <div class="row funktionen-row"> | ||
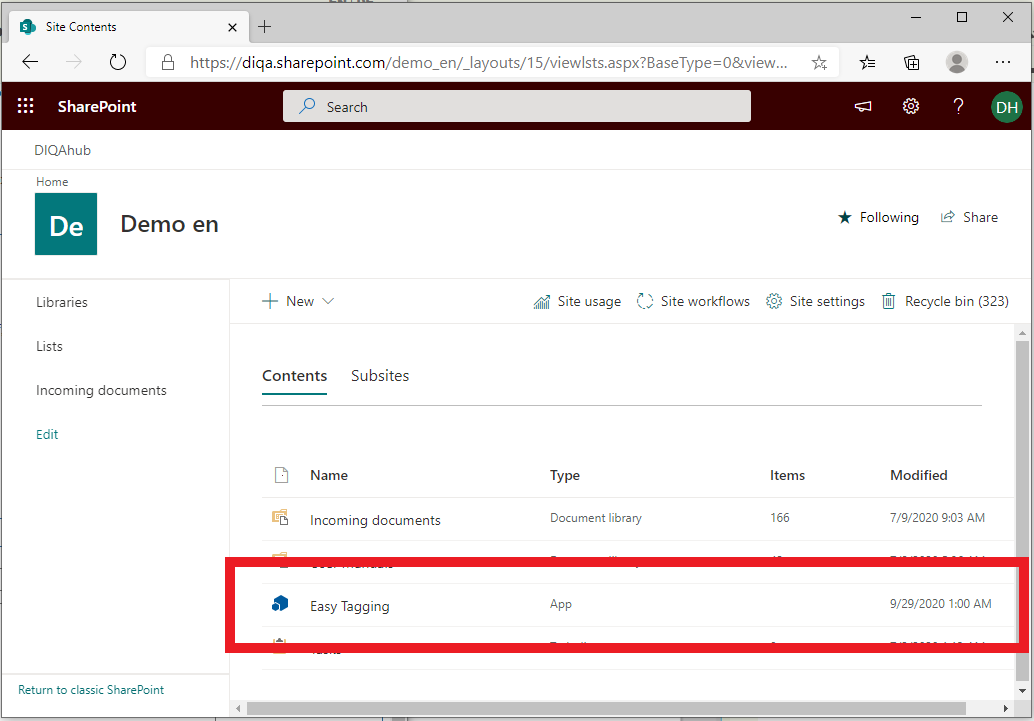
| Line 101: | Line 101: | ||
# The configuration page of the app opens in a new tab. | # The configuration page of the app opens in a new tab. | ||
<!-- --></div> | <!-- --></div> | ||
| − | <!-- --><div class="col-md-6 col-md-border funktionen imageExpand" style="text-align: justify; >[[File:Launch_the_app_modern.png | + | <!-- --><div class="col-md-6 col-md-border funktionen imageExpand" style="text-align: justify; >[[File:Launch_the_app_modern.png|center|middle]]</div> |
</div> | </div> | ||
<div class="row funktionen-row"> | <div class="row funktionen-row"> | ||
| Line 109: | Line 109: | ||
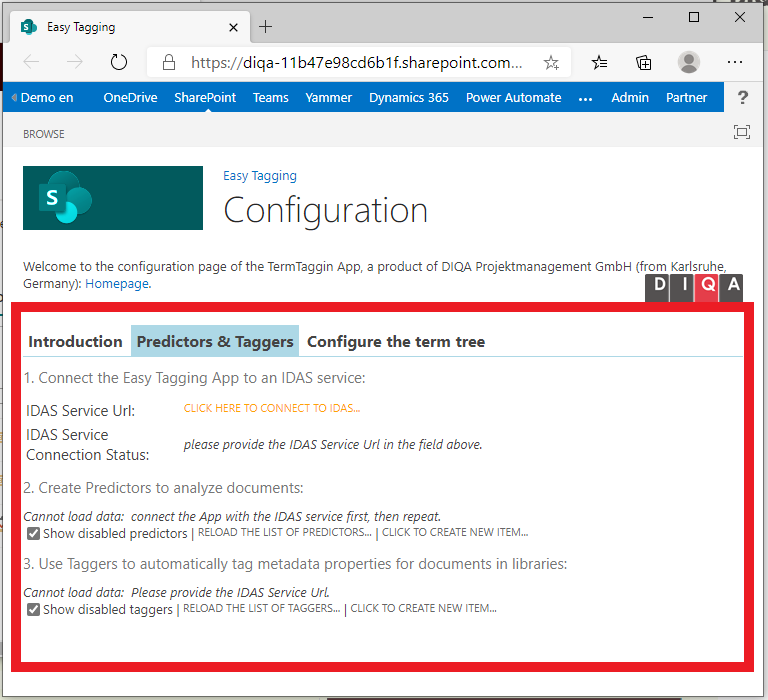
# Click on the link "Click here to connect to IDAS" | # Click on the link "Click here to connect to IDAS" | ||
<!-- --></div> | <!-- --></div> | ||
| − | <!-- --><div class="col-md-6 col-md-border funktionen imageExpand" style="text-align: justify; >[[File:Apptab.png | + | <!-- --><div class="col-md-6 col-md-border funktionen imageExpand" style="text-align: justify; >[[File:Apptab.png|center|middle]]</div> |
</div> | </div> | ||
| Line 120: | Line 120: | ||
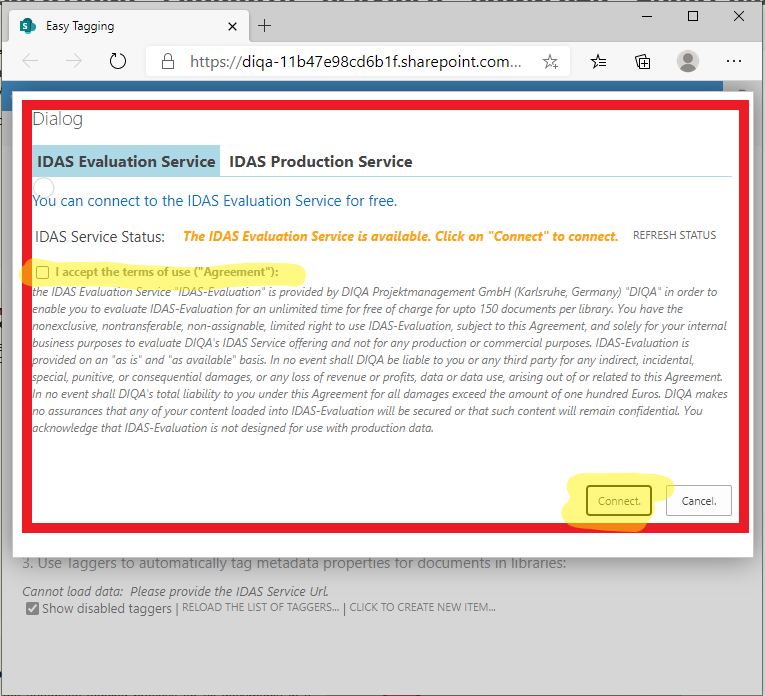
# The dialog closes and you can setup a predictor. | # The dialog closes and you can setup a predictor. | ||
<!-- --></div> | <!-- --></div> | ||
| − | <!-- --><div class="col-md-6 col-md-border funktionen imageExpand" style="text-align: justify; >[[File:Connect2.png | + | <!-- --><div class="col-md-6 col-md-border funktionen imageExpand" style="text-align: justify; >[[File:Connect2.png|center|middle]]</div> |
</div> | </div> | ||
<div class="row funktionen-row"> | <div class="row funktionen-row"> | ||
| Line 138: | Line 138: | ||
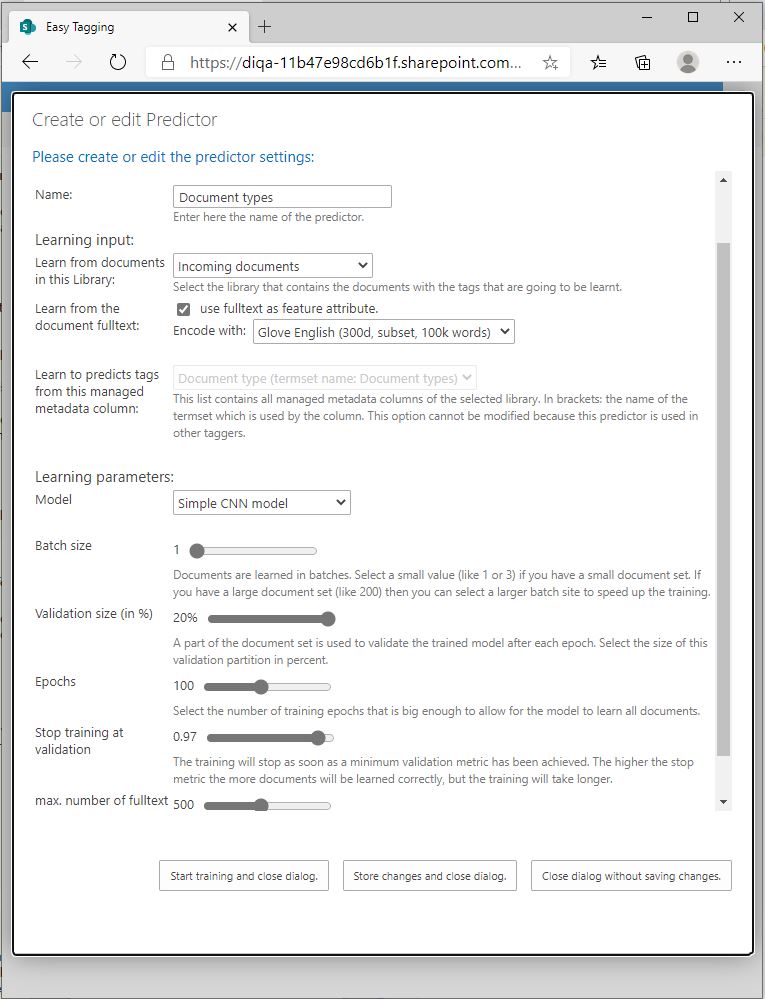
# You can inspect the progress of the training process in the status bar of the predictor. | # You can inspect the progress of the training process in the status bar of the predictor. | ||
<!-- --></div> | <!-- --></div> | ||
| − | <!-- --><div class="col-md-6 col-md-border funktionen imageExpand" style="text-align: justify; >[[File:Create_perdictor2.jpeg | + | <!-- --><div class="col-md-6 col-md-border funktionen imageExpand" style="text-align: justify; >[[File:Create_perdictor2.jpeg|center|middle]]</div> |
</div> | </div> | ||
<div class="row funktionen-row"> | <div class="row funktionen-row"> | ||
| Line 150: | Line 150: | ||
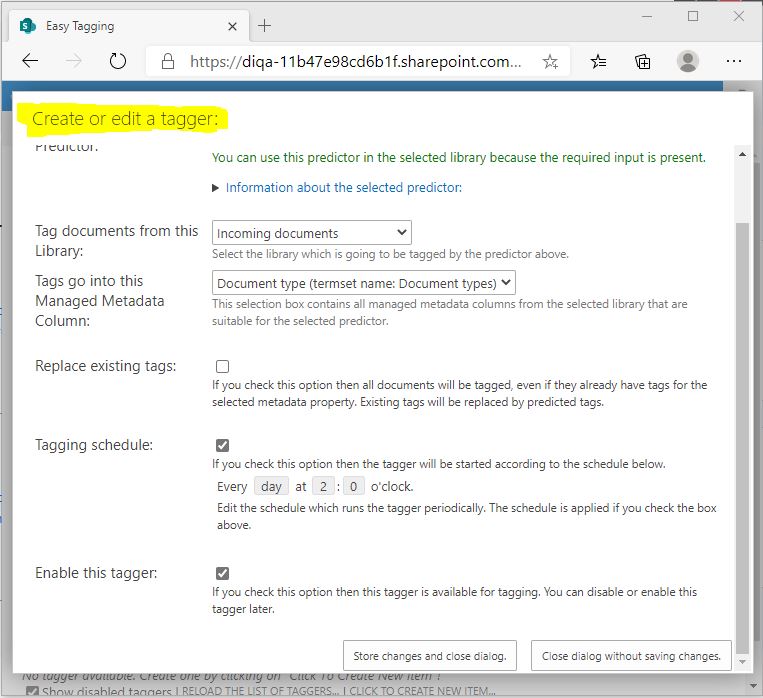
# Click on "Store changes" to create the new tagger. | # Click on "Store changes" to create the new tagger. | ||
<!-- --></div> | <!-- --></div> | ||
| − | <!-- --><div class="col-md-6 col-md-border funktionen imageExpand" style="text-align: justify; >[[File:Create_tagger.JPG | + | <!-- --><div class="col-md-6 col-md-border funktionen imageExpand" style="text-align: justify; >[[File:Create_tagger.JPG|center|middle]]</div> |
</div> | </div> | ||
<div class="row funktionen-row"> | <div class="row funktionen-row"> | ||
| Line 160: | Line 160: | ||
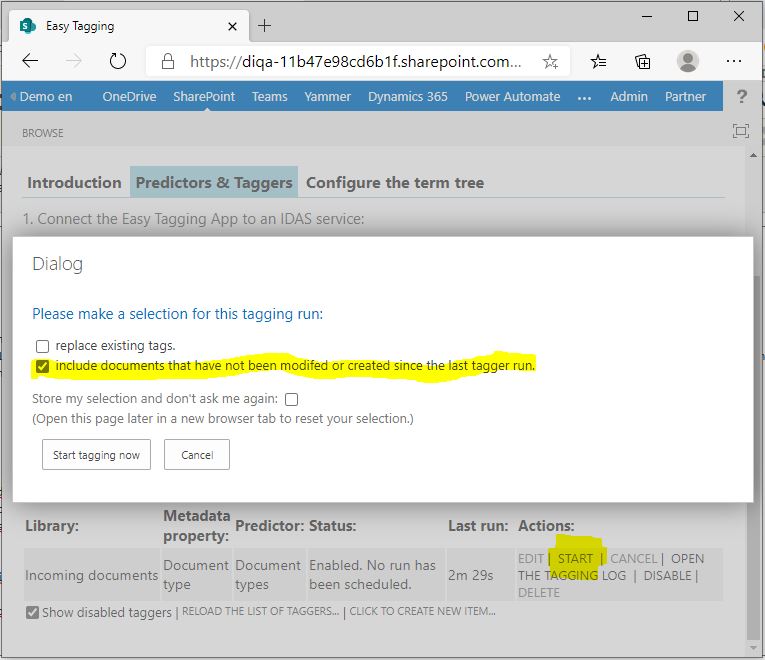
# After the tagging has completed you can inspect the tagging log of the tagger (action link "open the tagging log") | # After the tagging has completed you can inspect the tagging log of the tagger (action link "open the tagging log") | ||
<!-- --></div> | <!-- --></div> | ||
| − | <!-- --><div class="col-md-6 col-md-border funktionen imageExpand" style="text-align: justify; >[[File:Start_tagging_2.JPG | + | <!-- --><div class="col-md-6 col-md-border funktionen imageExpand" style="text-align: justify; >[[File:Start_tagging_2.JPG|center|middle]]</div> |
</div> | </div> | ||
<div class="row funktionen-row"> | <div class="row funktionen-row"> | ||
| Line 170: | Line 170: | ||
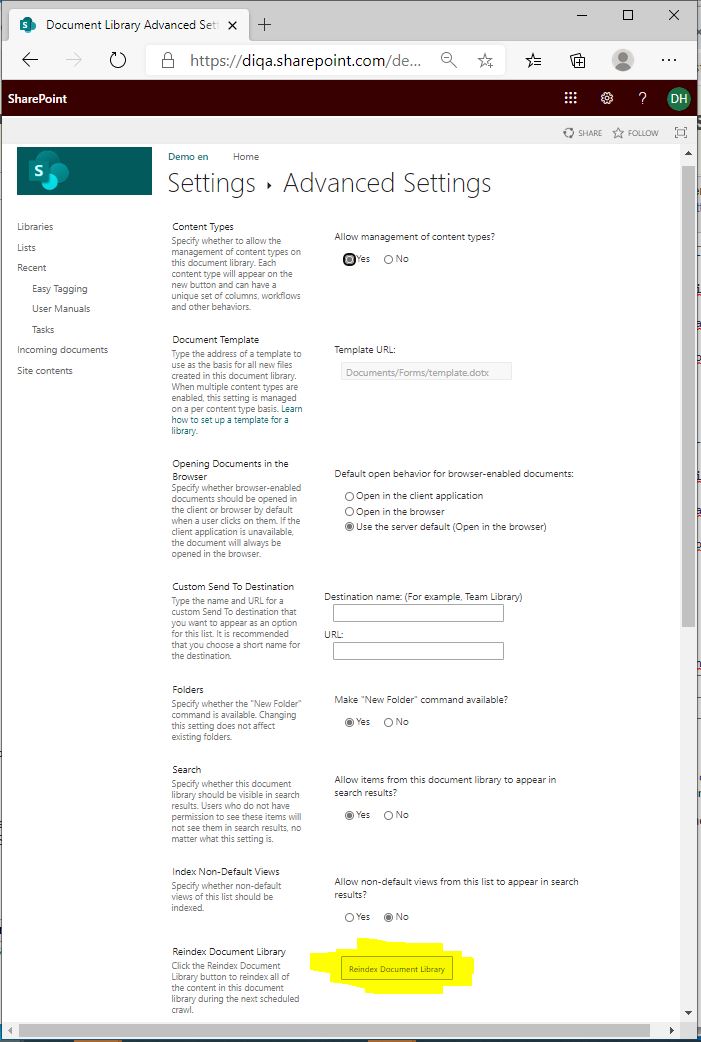
<big>Now all your documents in the library have been provided with tags, and the search index is being updated in the background. You can now carry on and setup the search page that uses these tags.</big> | <big>Now all your documents in the library have been provided with tags, and the search index is being updated in the background. You can now carry on and setup the search page that uses these tags.</big> | ||
<!-- --></div> | <!-- --></div> | ||
| − | <!-- --><div class="col-md-6 col-md-border funktionen imageExpand" style="text-align: justify; >[[File:Library_settings.JPG | + | <!-- --><div class="col-md-6 col-md-border funktionen imageExpand" style="text-align: justify; >[[File:Library_settings.JPG|center|middle]]</div> |
</div> | </div> | ||
</p> | </p> | ||
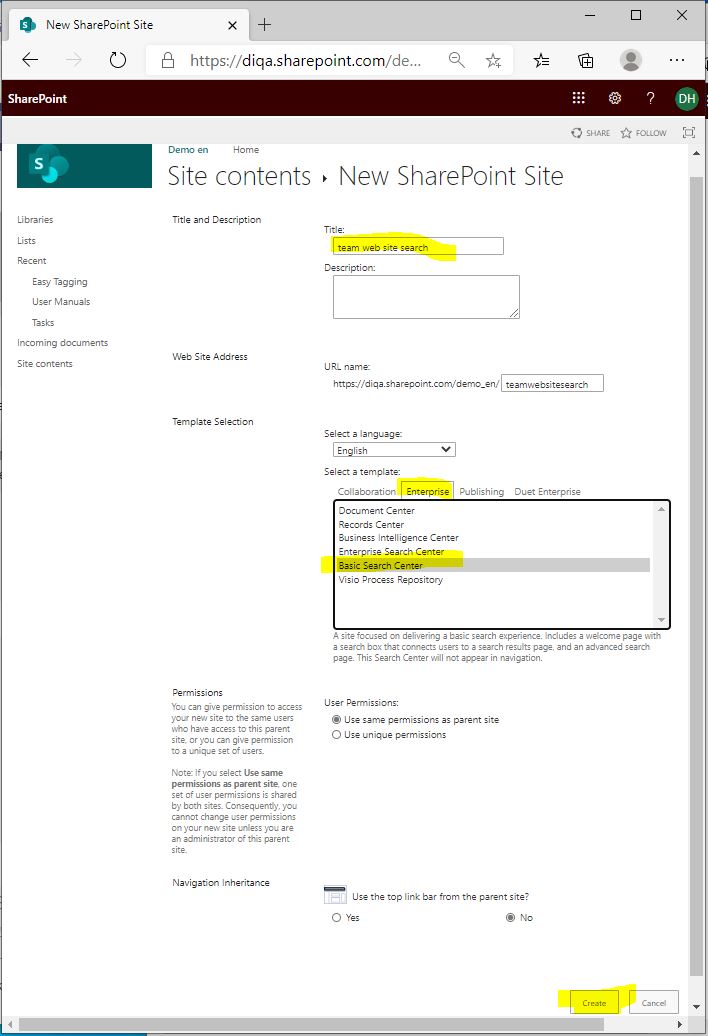
| Line 186: | Line 186: | ||
# Click on "Create" to create the new seach center. | # Click on "Create" to create the new seach center. | ||
<!-- --></div> | <!-- --></div> | ||
| − | <!-- --><div class="col-md-6 col-md-border funktionen imageExpand" style="text-align: justify; >[[File:Create_search_center.JPG | + | <!-- --><div class="col-md-6 col-md-border funktionen imageExpand" style="text-align: justify; >[[File:Create_search_center.JPG|center|middle]]</div> |
</div> | </div> | ||
<div class="row funktionen-row"> | <div class="row funktionen-row"> | ||
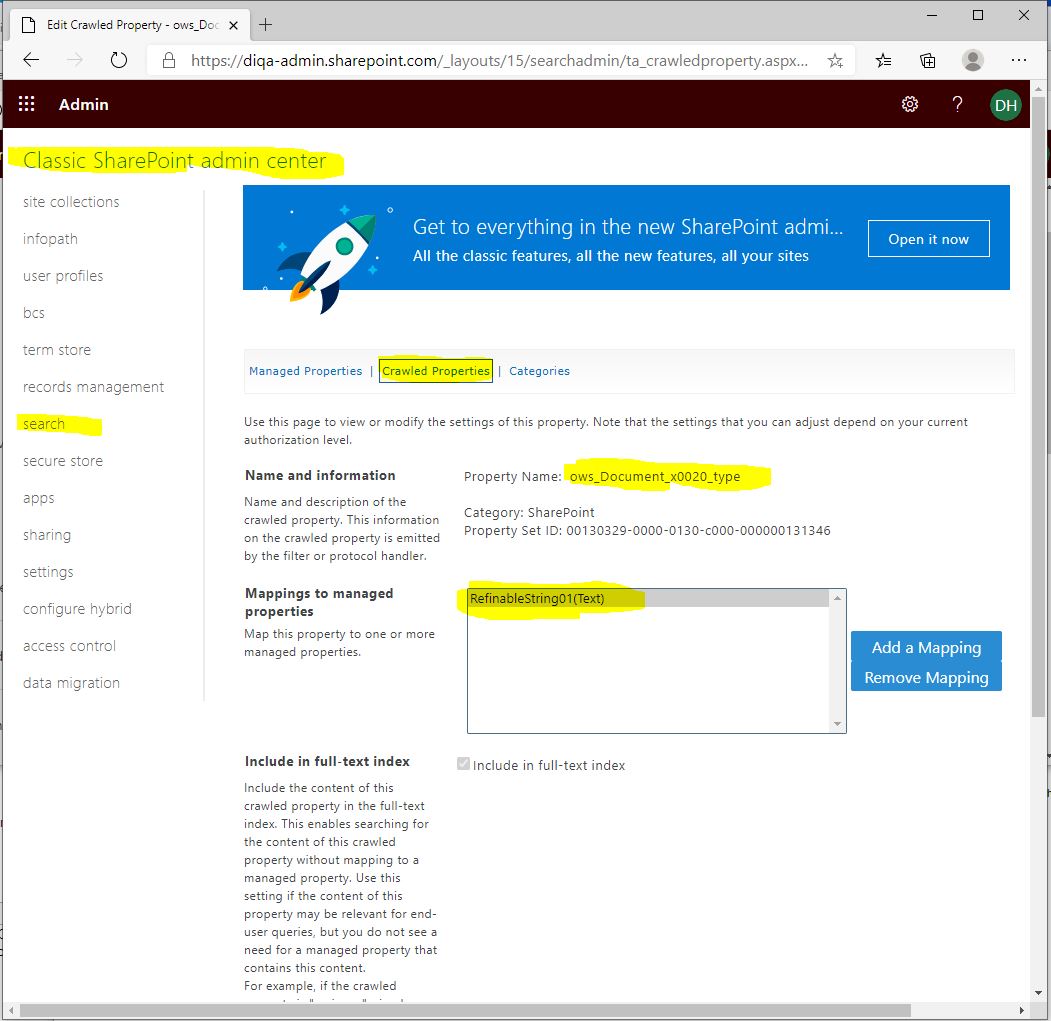
| Line 200: | Line 200: | ||
# Save the settings. | # Save the settings. | ||
<!-- --></div> | <!-- --></div> | ||
| − | <!-- --><div class="col-md-6 col-md-border funktionen imageExpand" style="text-align: justify; >[[File:Searchschema.JPG | + | <!-- --><div class="col-md-6 col-md-border funktionen imageExpand" style="text-align: justify; >[[File:Searchschema.JPG|center|middle]]</div> |
</div> | </div> | ||
<div class="row funktionen-row"> | <div class="row funktionen-row"> | ||
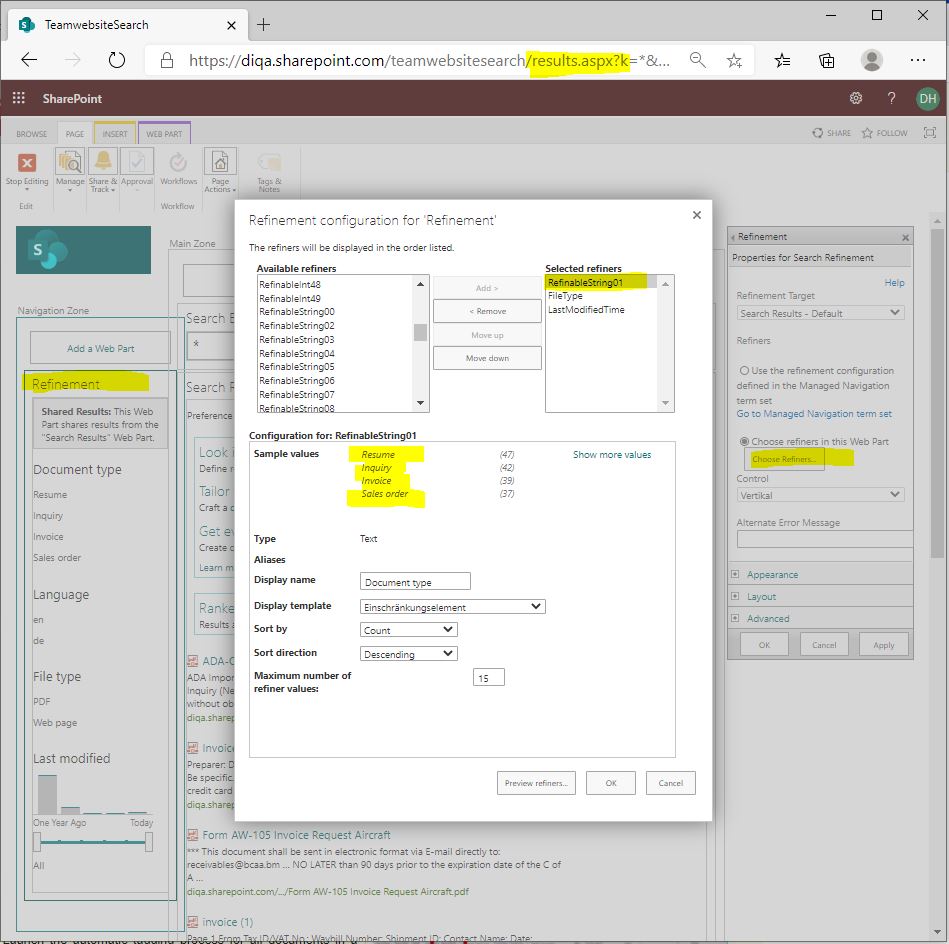
| Line 217: | Line 217: | ||
# Store the modified page. | # Store the modified page. | ||
<!-- --></div> | <!-- --></div> | ||
| − | <!-- --><div class="col-md-6 col-md-border funktionen imageExpand" style="text-align: justify; >[[File:Search_refiner.JPG | + | <!-- --><div class="col-md-6 col-md-border funktionen imageExpand" style="text-align: justify; >[[File:Search_refiner.JPG|center|middle]]</div> |
</div> | </div> | ||
<div class="row funktionen-row"> | <div class="row funktionen-row"> | ||
| Line 229: | Line 229: | ||
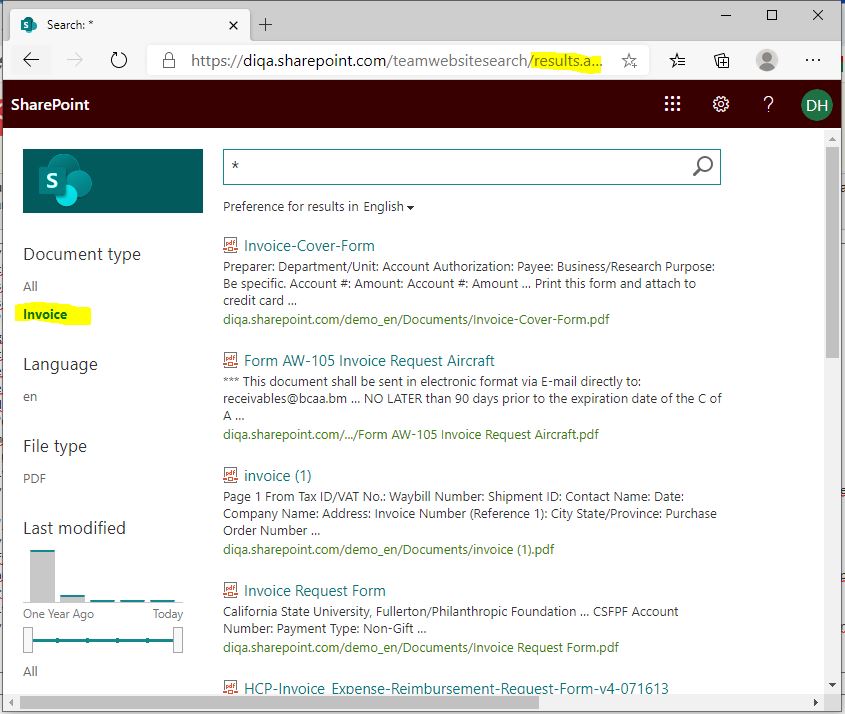
<big>If the new refiner does not contain values then you have to wait until the Sharepoint online search engine has completed re-indexing your library. If still no values show up then you have to go back to your library settings and click on "re-index library".</big> | <big>If the new refiner does not contain values then you have to wait until the Sharepoint online search engine has completed re-indexing your library. If still no values show up then you have to go back to your library settings and click on "re-index library".</big> | ||
<!-- --></div> | <!-- --></div> | ||
| − | <!-- --><div class="col-md-6 col-md-border funktionen imageExpand" style="text-align: justify; >[[File:Searchresults.JPG | + | <!-- --><div class="col-md-6 col-md-border funktionen imageExpand" style="text-align: justify; >[[File:Searchresults.JPG|center|middle]]</div> |
</div> | </div> | ||
Revision as of 10:33, 30 September 2020
O365: Boost document findability with tags (September 1, 2020)
Finding documents in Sharepoint online/Office 365 can be tedious. If you want to restrict your search to certain document types (like: reports, inquiries, CVs, sales orders, invoices) you either end up with too many irrelevant search hits or relevant documents don't show up because they don't include the search term. If you rely on Sharepoint's fulltext search capabilities only, then your users will be frustrated and spend too much time to find the right documents.
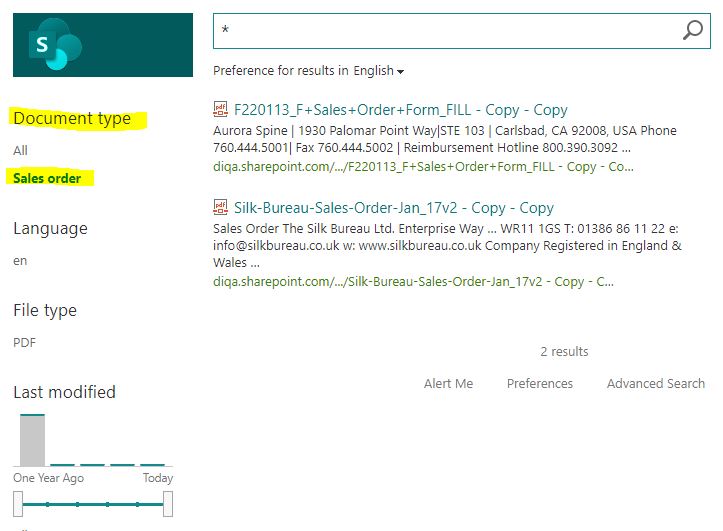
You can provide your users with a better search experience if you use search refiners. Users can further refine their search result by clicking on the refiner values, e.g. to retrieve "sales orders" or "invoices", only. Before you are able to create meaningful search refiners, you have to arrange for a couple of pre-requisites which include tagging documents with tags. This guide shows you how to automatically tag documents with their type (e.g. invoice, sales order, cv, inquiry) and how to provide search refiners that contain these document types.
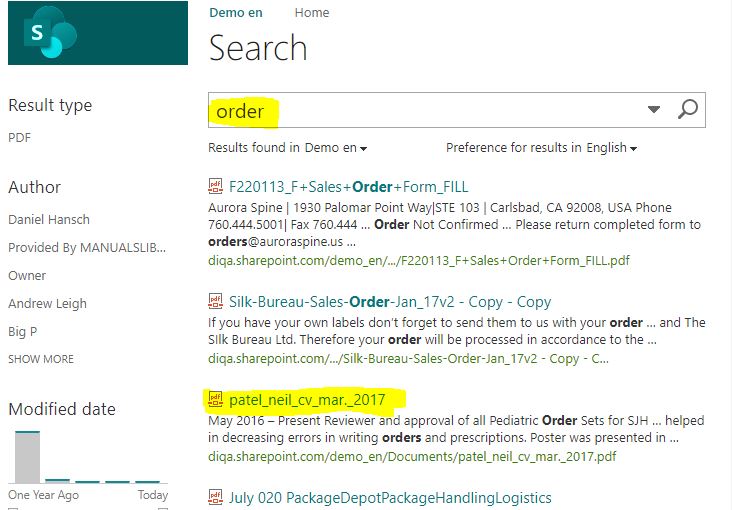
Frustrating search experience without meaningful refiners:
Entering the search term "order" returns a lot of irrelevant documents (e.g. a CV) and even misses some sales order documents.
